Claude Design Review: Features, Pricing, and Real Limitations

Horea Matei
Created on May 4, 2026
Anthropic Labs launched the Claude Design research preview on April 17th, 2026, and its release caused major movements in the design space. Figma's stock price dropped by 7%, while Claude's search interest on Google Trends hit an all-time high.
Claude Design's launch generated lots of enthusiasm. But is the hype justified? The short answer: partly. I was genuinely impressed with the platform's outputs, but also found quite a few drawbacks that could be deal-breakers for some audiences. Plus, it's an early-access product: it has bugs and UX-related quirks.
This post walks you through exactly what Claude Design is, and what it can and can't do with it. I'll also show you its pros, cons, and how it stacks up against some of its competitors: all based on my own personal testing and research findings.
What is Claude Design?
Claude Design is an Anthropic Labs-developed AI visual design tool. The platform uses your text prompts to generate all sorts of design types: interactive prototypes, one-page websites, design systems, wireframes, slide decks, and other marketing assets.

Although the platform fulfills various design-related use cases, it's worth clarifying that Claude Design is not:
-
A full design system management tool like Figma
-
A code-generation platform like Lovable or v0
-
A template marketplace like Canva
Claude Design carved its own niche: a conversational design generation tool with brand awareness and code hand-off capabilities is probably one of the best ways to describe it.
Claude Design is powered by Claude Opus 4.7, Anthropic's top-shelf vision model. It features high-resolution image support (2576px/3.75MP), better file system-based memory, and prompt interpretation capabilities.
That means Claude Opus 4.7 generates more accurate prototypes and layouts based on your existing design files, and adopts a design-thinking approach to solving your prompts. Claude reads your codebase and design files to extract elements like fonts, colors, and components, and auto-apply them across all your future projects.
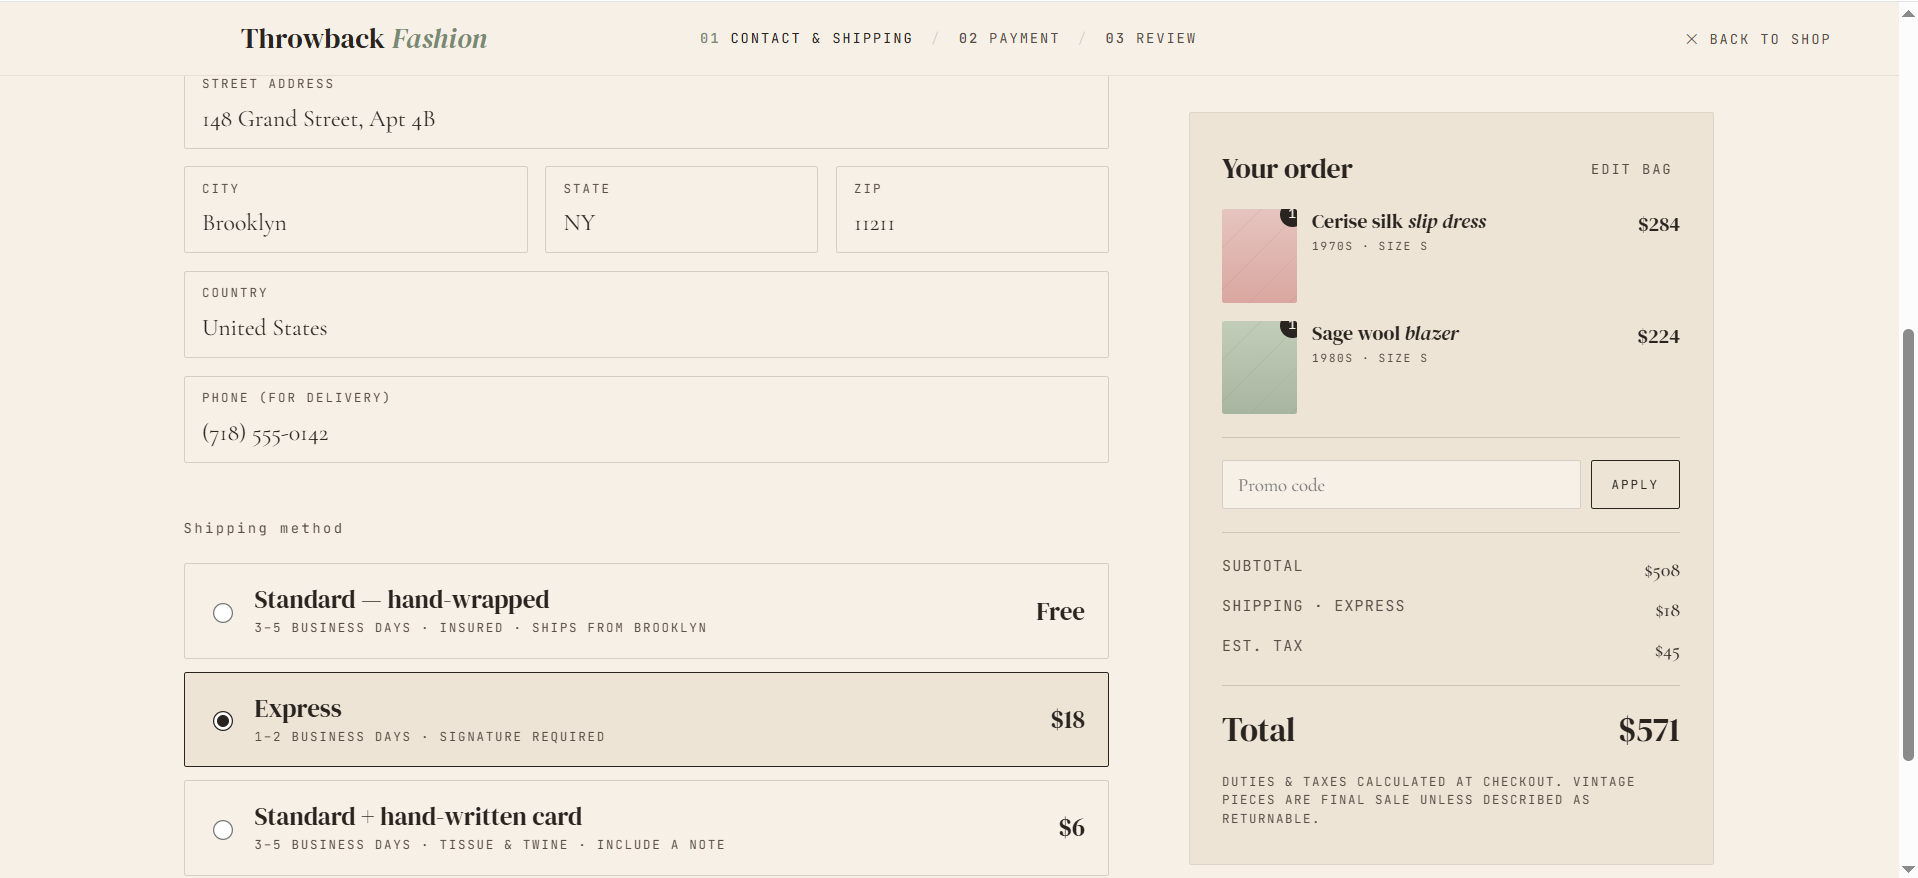
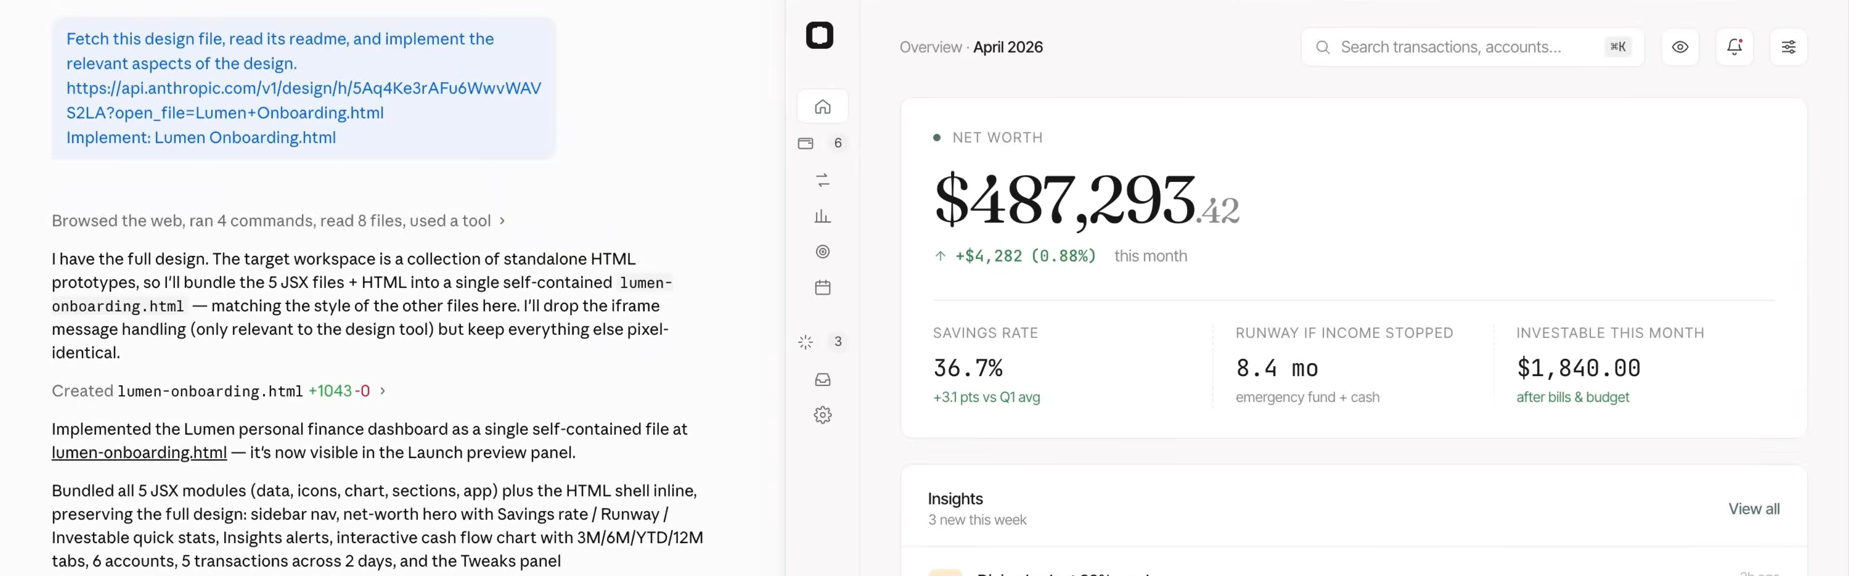
I found that Claude Opus 4.7 works quite well: it turns prompts into very detailed output that feels much more complete and advanced compared to other platforms, like Figma Make, for example. Case in point, the screenshot below showcases a full-interactive checkout flow Claude built from a single prompt:
Claude Design is not a standalone solution. You'll need an active Pro, Max, Team, or Enterprise Claude AI subscription, which starts at $20 per month. Since Claude Design is part of Anthropic's ecosystem, you can also use the platform alongside Claude Code for production readiness.
Claude Design features
This section walks you through a brief rundown of the features that stood out to me while testing Claude Design.
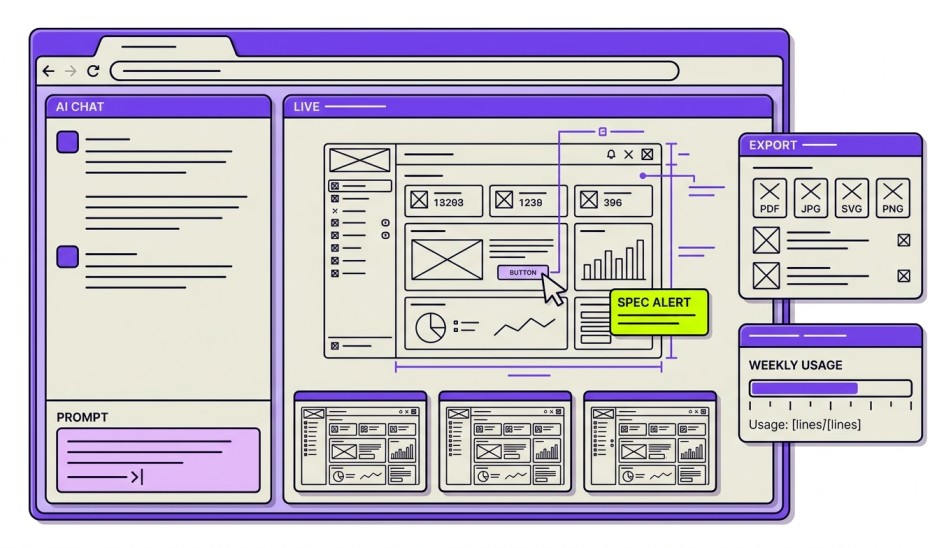
Design system setups
Claude generates full design systems based on existing documents: GitHub or local codebases, Figma files, design style guides, fonts, logos, and other assets.
The platform will use the generated design system across all future projects: super useful to build on-brand layouts, minimize post-generation editing times, and avoid generic aesthetics.
Claude Design also generates design systems based on layouts built right in the app. Here's an output example:
The design system above was based on an eCommerce homepage layout I generated with Claude Design.
I like how the entire design system kept the eCommerce format: it includes dedicated sections for checkout and product card components, for example. I could easily reuse this system across future eCommerce projects.
Still, it's worth noting this feature burns through AI credits rather quickly, especially on the entry-level plan.
Claude Design to Claude Code hand-offs
The Claude Design-to-Code hand-off tool lets you strike a good balance between function and aesthetics. You can use Claude Design to fine-tune UIs and improve interactivity via Claude Code, for example.
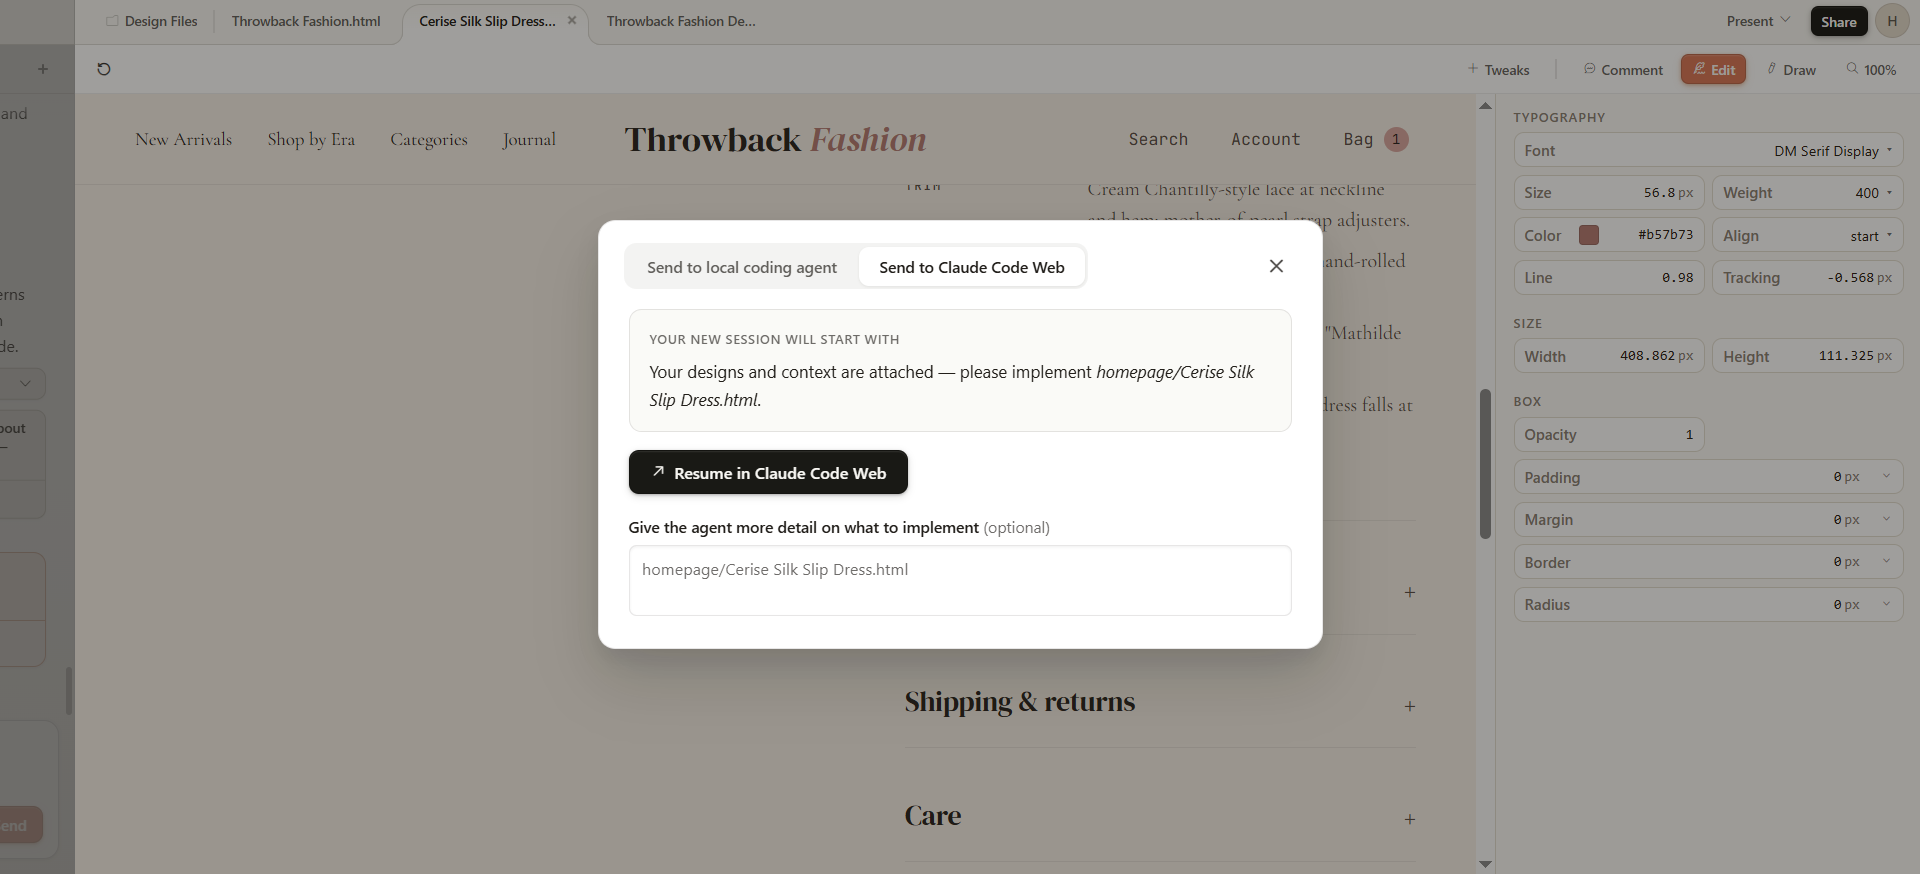
Power users and professional designers can also use Claude Code to modify a design's front-end for extra-precise UI editing or adding back-end functionality.
Plus, this feature combo can make Claude a solid alternative to code-centric AI design tools like Loveable: such tools don't offer as much flexibility design-wise, and Claude Design can fill in that gap.
But again, this feature eats up a lot of AI tokens.
Team collaboration
Claude Design features built-in team collaboration tools. You can share projects with team members through shareable links and assign them viewer, commenter, or editor permissions.
Editors and commenters can leave feedback through annotations and under a dedicated comments section, something I found useful.
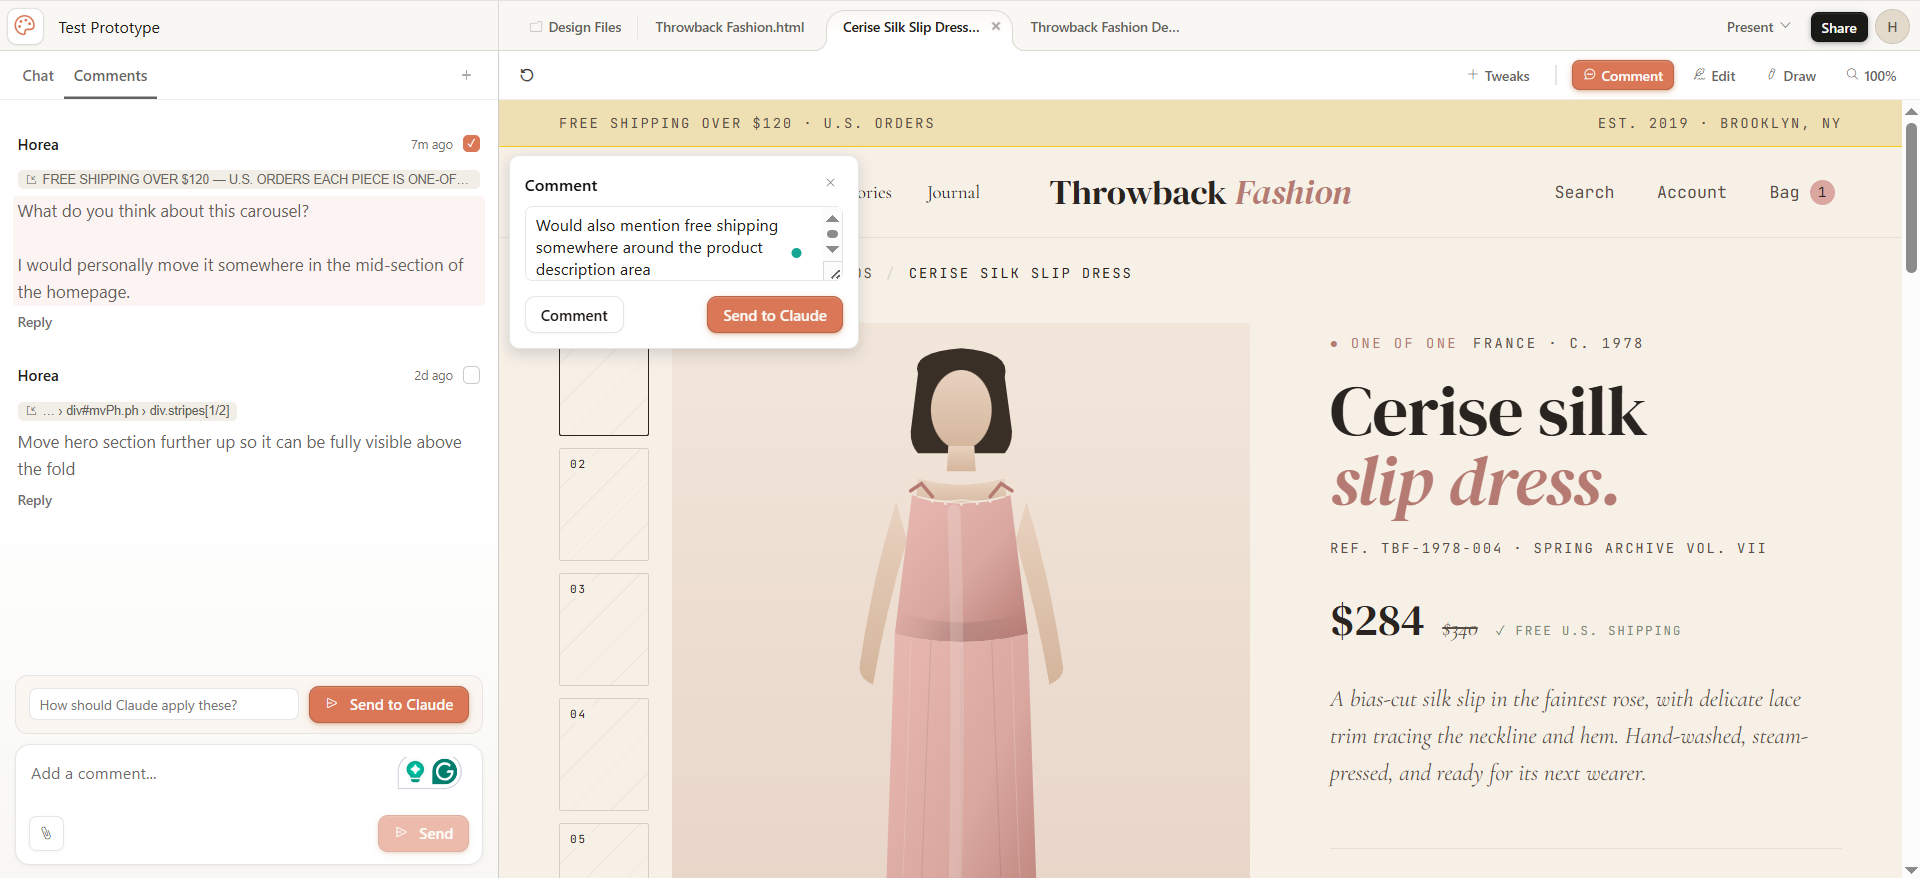
The option to turn comments into Claude commands is a nice touch for precise edits.
Still, I noticed that annotations are quite easy to miss. There's no visual feedback on the design canvas itself. You can only view annotations by hovering your mouse over particular comments in the chatbox. Claude then highlights their corresponding design sections.
This makes collaboration quite tricky: you won't know which design elements require further edits unless you hover your mouse over each single chatbox comment.
Slide Decks
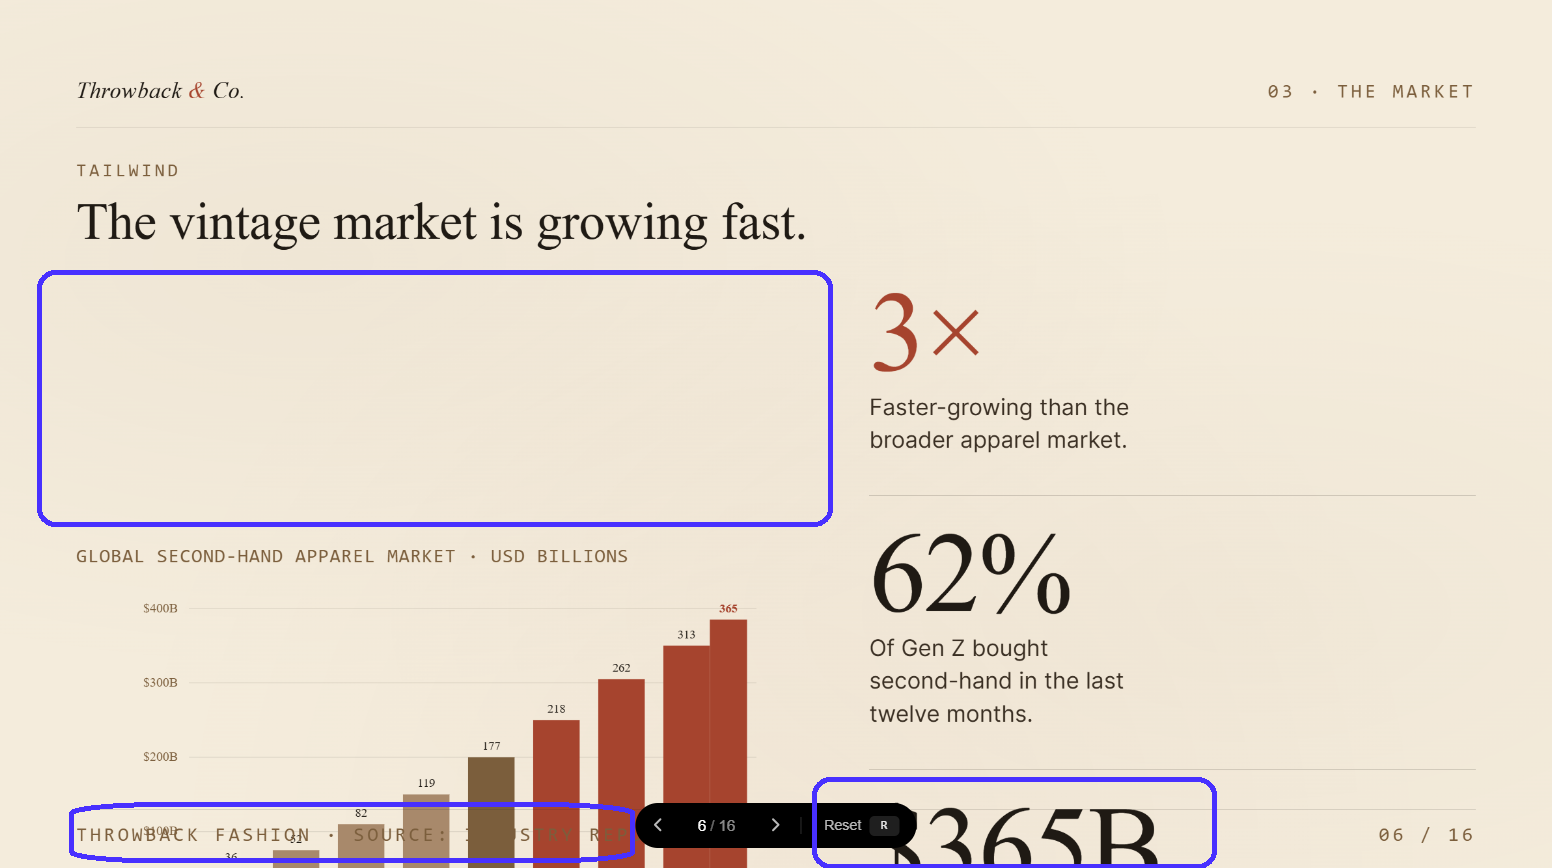
Claude Design also includes a dedicated slide deck generator. I found it super useful for brainstorming presentation layout ideas or for skipping the slide design process, so marketers can fully focus on the core message.
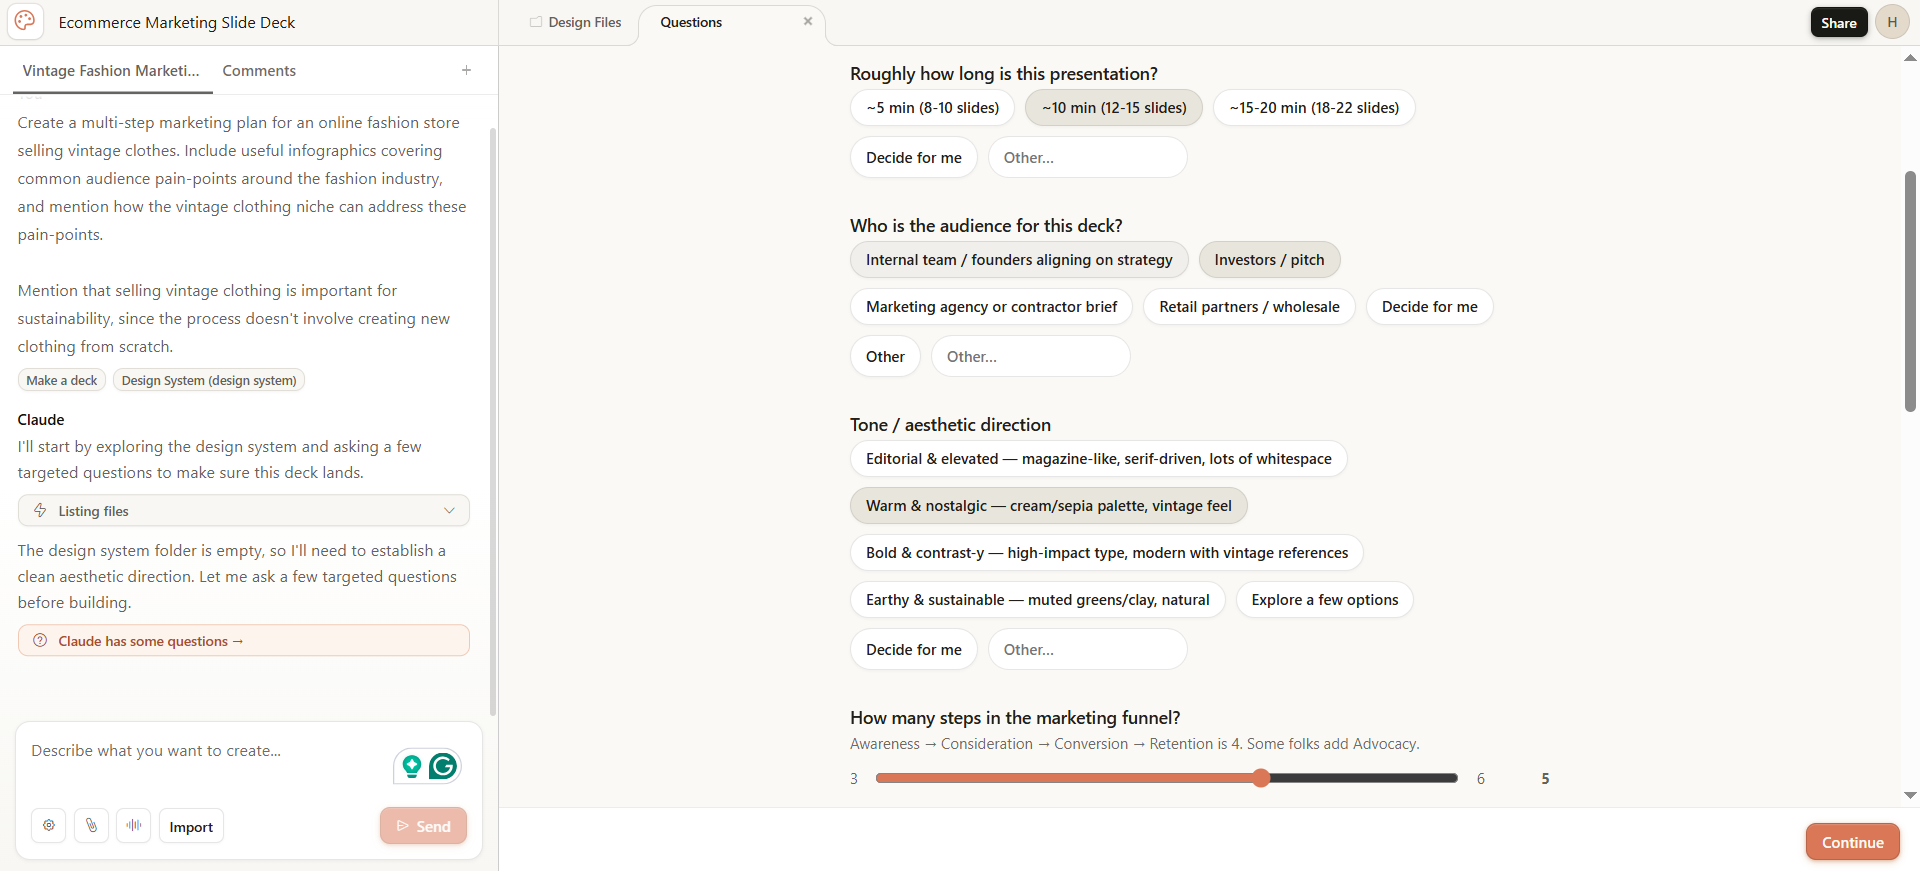
For example, I asked Claude to generate a multi-step marketing plan for an online store that sells vintage clothing and highlight sustainability as a key pain point that the vintage clothing niche solves.
The platform then generated a 16-slide presentation doing exactly that. Plus, it included statistics, target KPIs, and marketing strategies to tackle.
Here’s an output snippet:
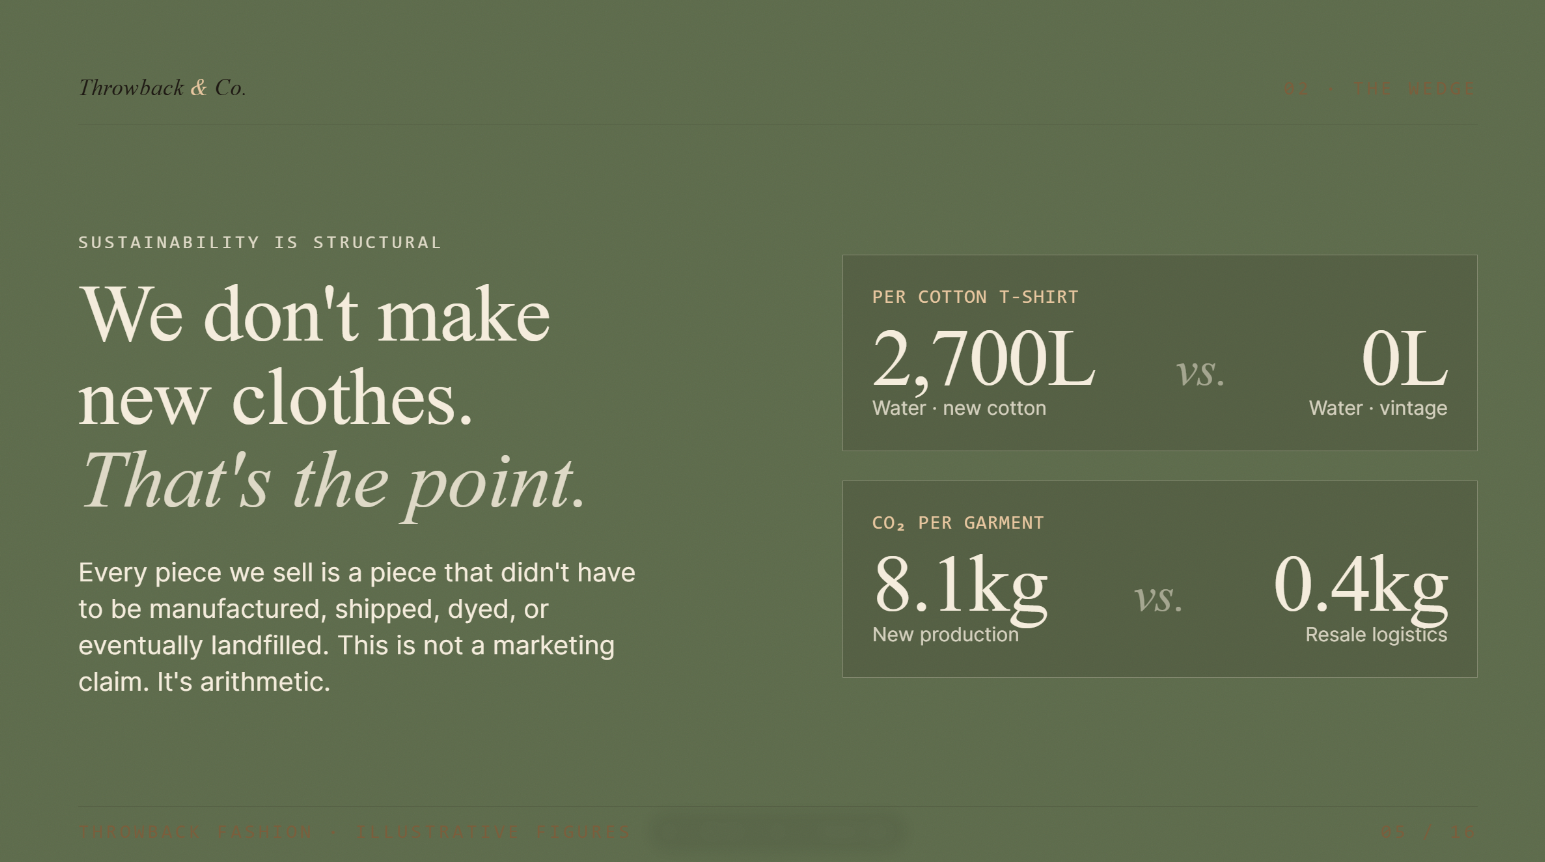
I could replace the data with info from verified sources, do some adjustments to the layout, refine the copy, and use most of the generated output in a real marketing plan presentation.
Still, visual adjustments will require exporting the output to an external design tool, like Canva. I noticed Claude is prone to content-level errors: texts often overlap while design elements don’t display properly, for example.
Lacking a native pixel-perfect editor makes fixing these issues in Claude particularly time-consuming.
How to use Claude Design
Claude Design is rather picky about how you use it. Experiment with it too much, and you'll likely find yourself out of credits by the time you're halfway through your project.
That said, let me show you how to use it more efficiently.
1. Access Claude Design
Claude Design is available across Claude AI's paid subscription plans: Pro, Max, Team, or Enterprise. Claude Pro starts at $20 per month (billed monthly).
I recommend starting with Claude Pro, so you can get to know the platform a bit better before you decide whether to commit to an upper-tier package.
You'll then access Claude Design via the left sidebar color palette icon in the main Claude AI dashboard.
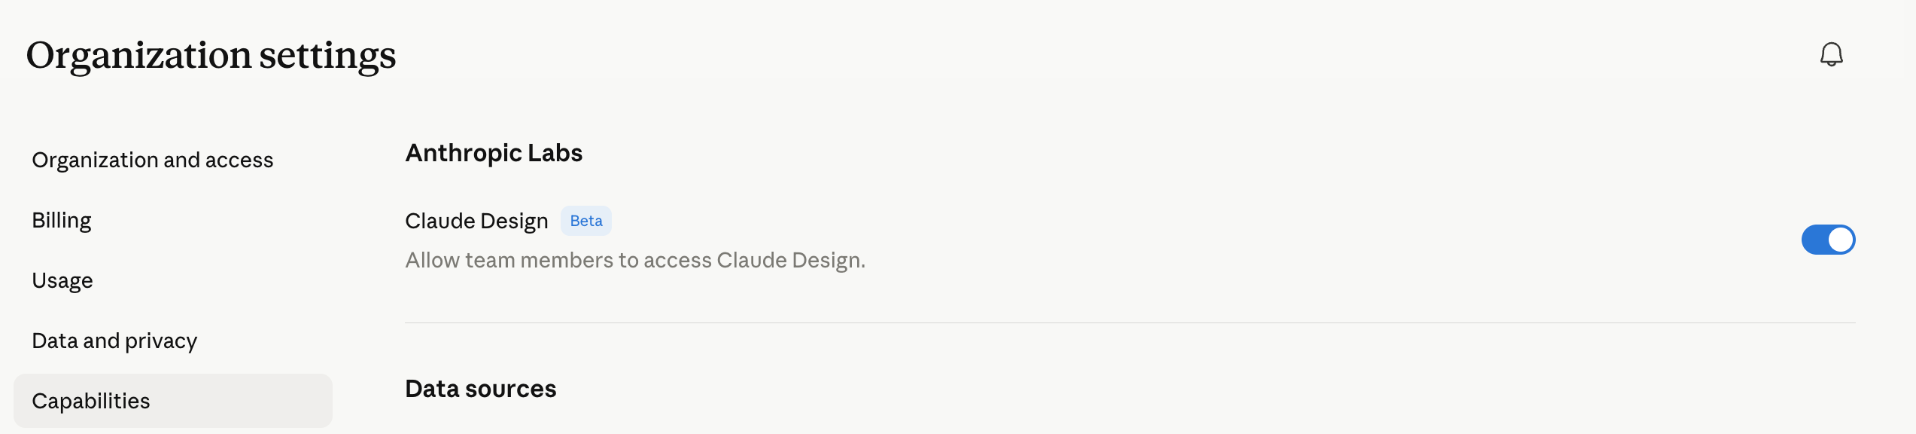
Note that Claude Design is only available in Claude AI's browser app, and not the desktop app. Also, Enterprise users will have Claude Design turned off by default. Go to Organization settings, then select Capabilities to enable it.
2. Describe your design in the chat
Once you're in the main dashboard, you can create a new project through the left-side toolbar.
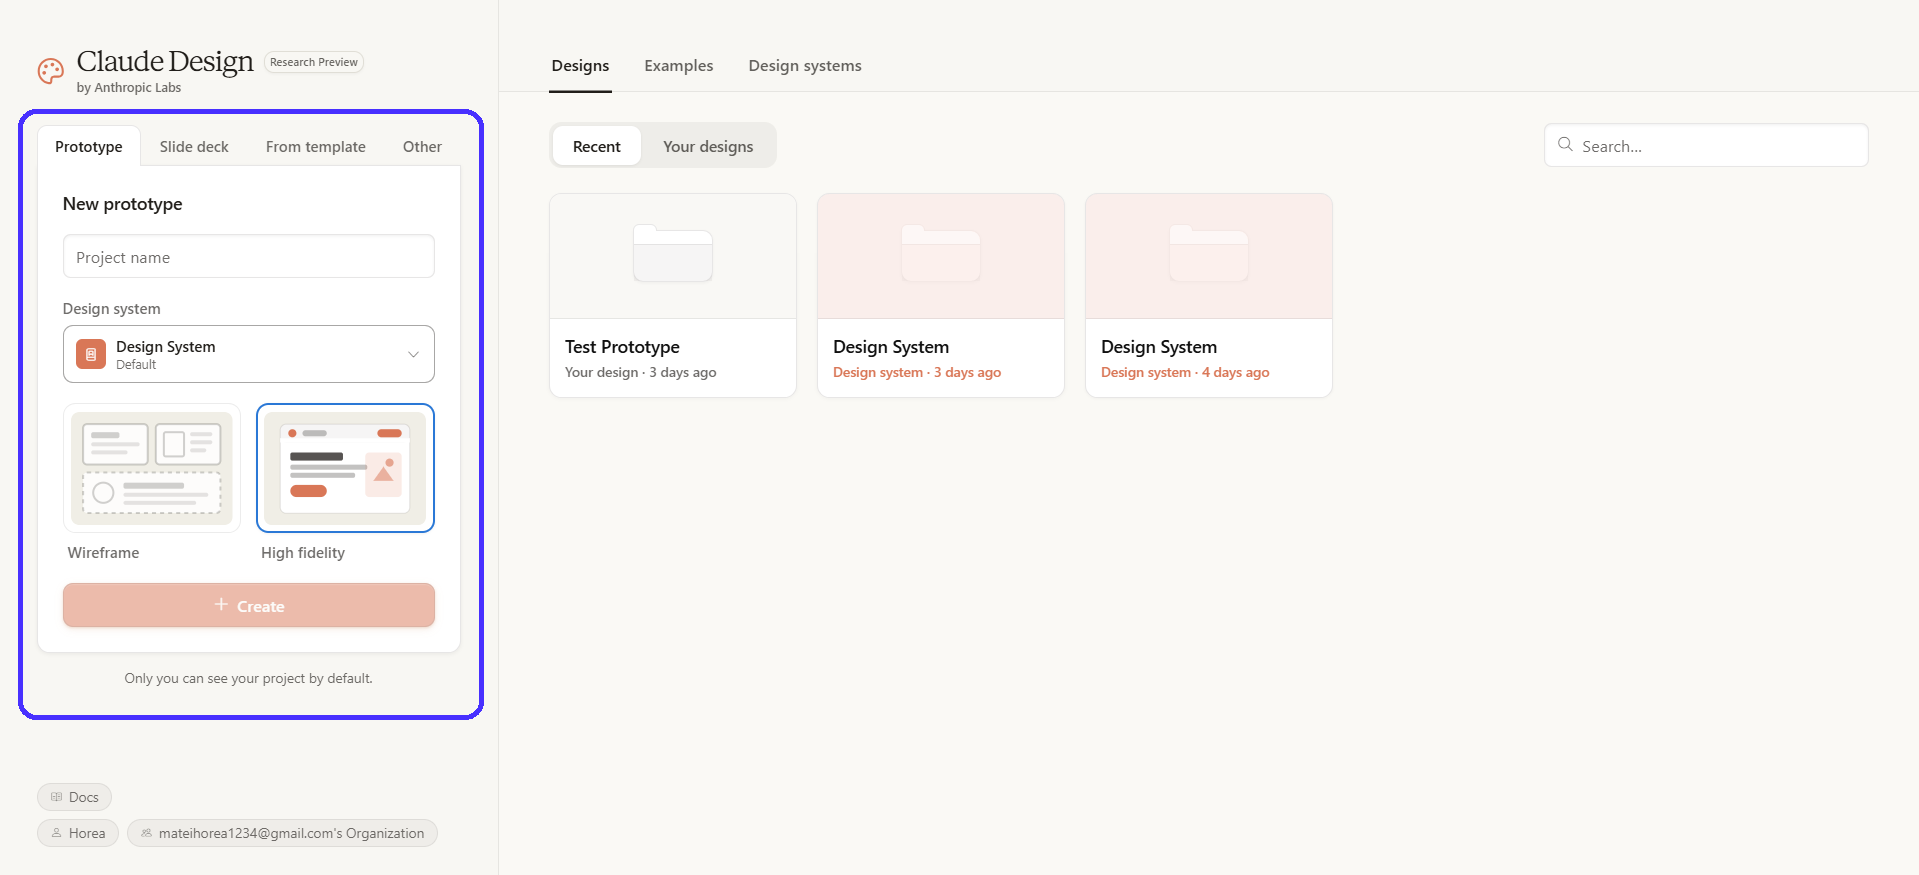
You can pick between:
-
Prototypes (wireframes and HiFi designs)
-
Slide decks
-
Form templates
-
Custom projects
There's also the option to select between design systems. You can either use the default components or generate your own by importing assets from Figma files, for example.
I would personally recommend Pro Plan subscribers stick with the default system to start with, because generating new ones uses a lot of credits.
For this project, I'll set up a HiFi prototype for an online fashion store website. Once you click on the +Create button, you'll be taken to the project canvas.
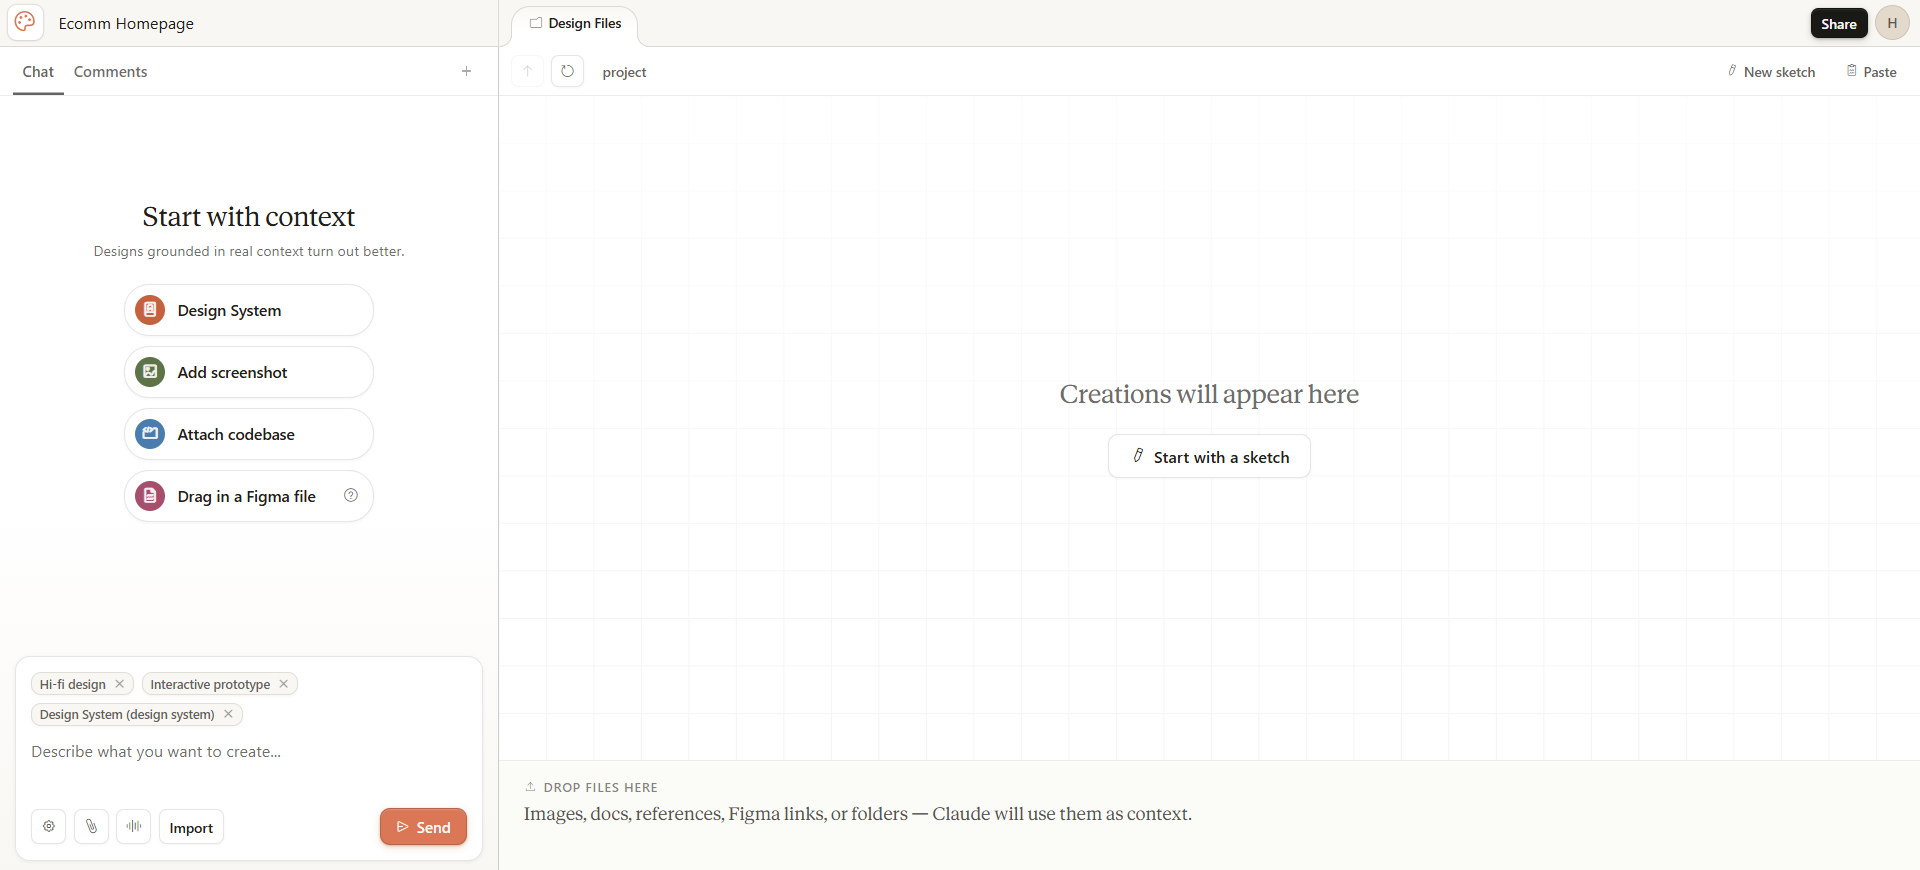
Be as specific as possible here to minimize post-generation editing. If you have the credits, add context through Figma files, codebase links, screenshots, or design systems for extra-accurate outputs.
Descriptive prompts are just as important. Specify exactly what you want to build, the design language Claude should follow, the color palette to include, and so on.
Here's the prompt I used, for example:
“Generate a homepage design for an online fashion store selling vintage clothes. The design language should be minimalist. Use whitespace to bring attention to product photos. The homepage's color scheme should follow a pastel-based color palette.”
Instructions around your target viewports are also recommended: be they mobiles, desktops, tablets, or all three.
Next, Claude builds a personalized quiz with extra clarifying questions regarding your project's direction. The more descriptive the prompt, the more specific the quiz.
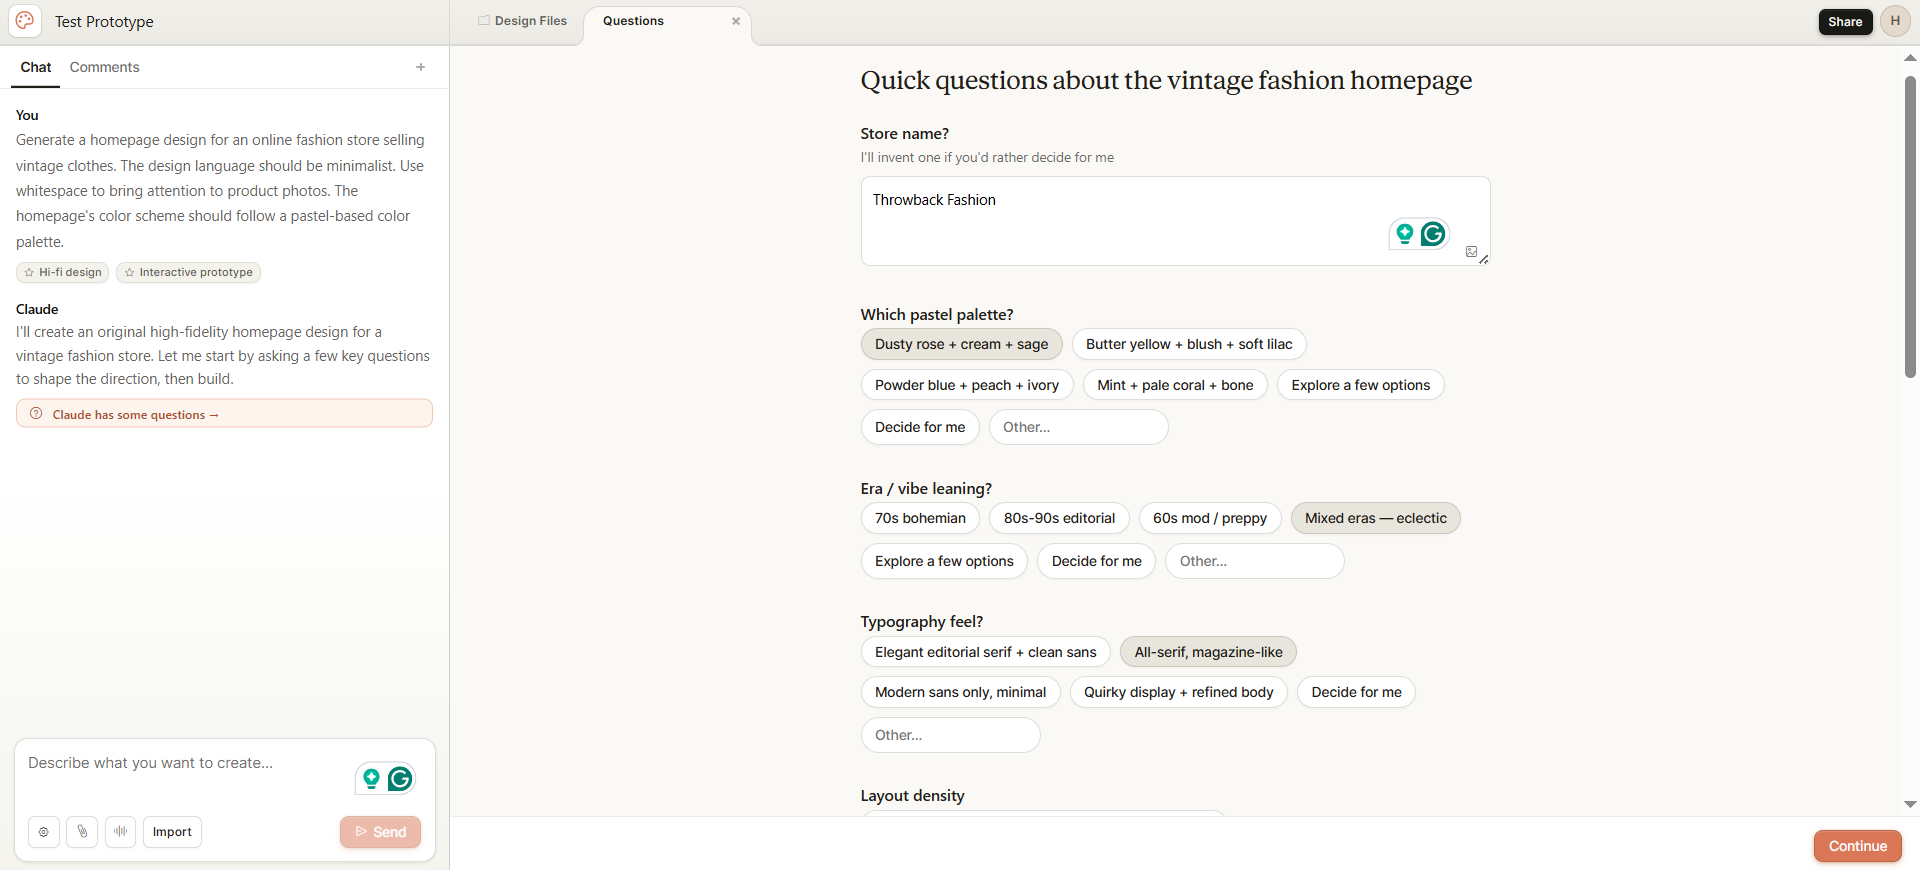
Don't skip this step. Check as many boxes as possible to avoid generic outputs and reduce future editing times.
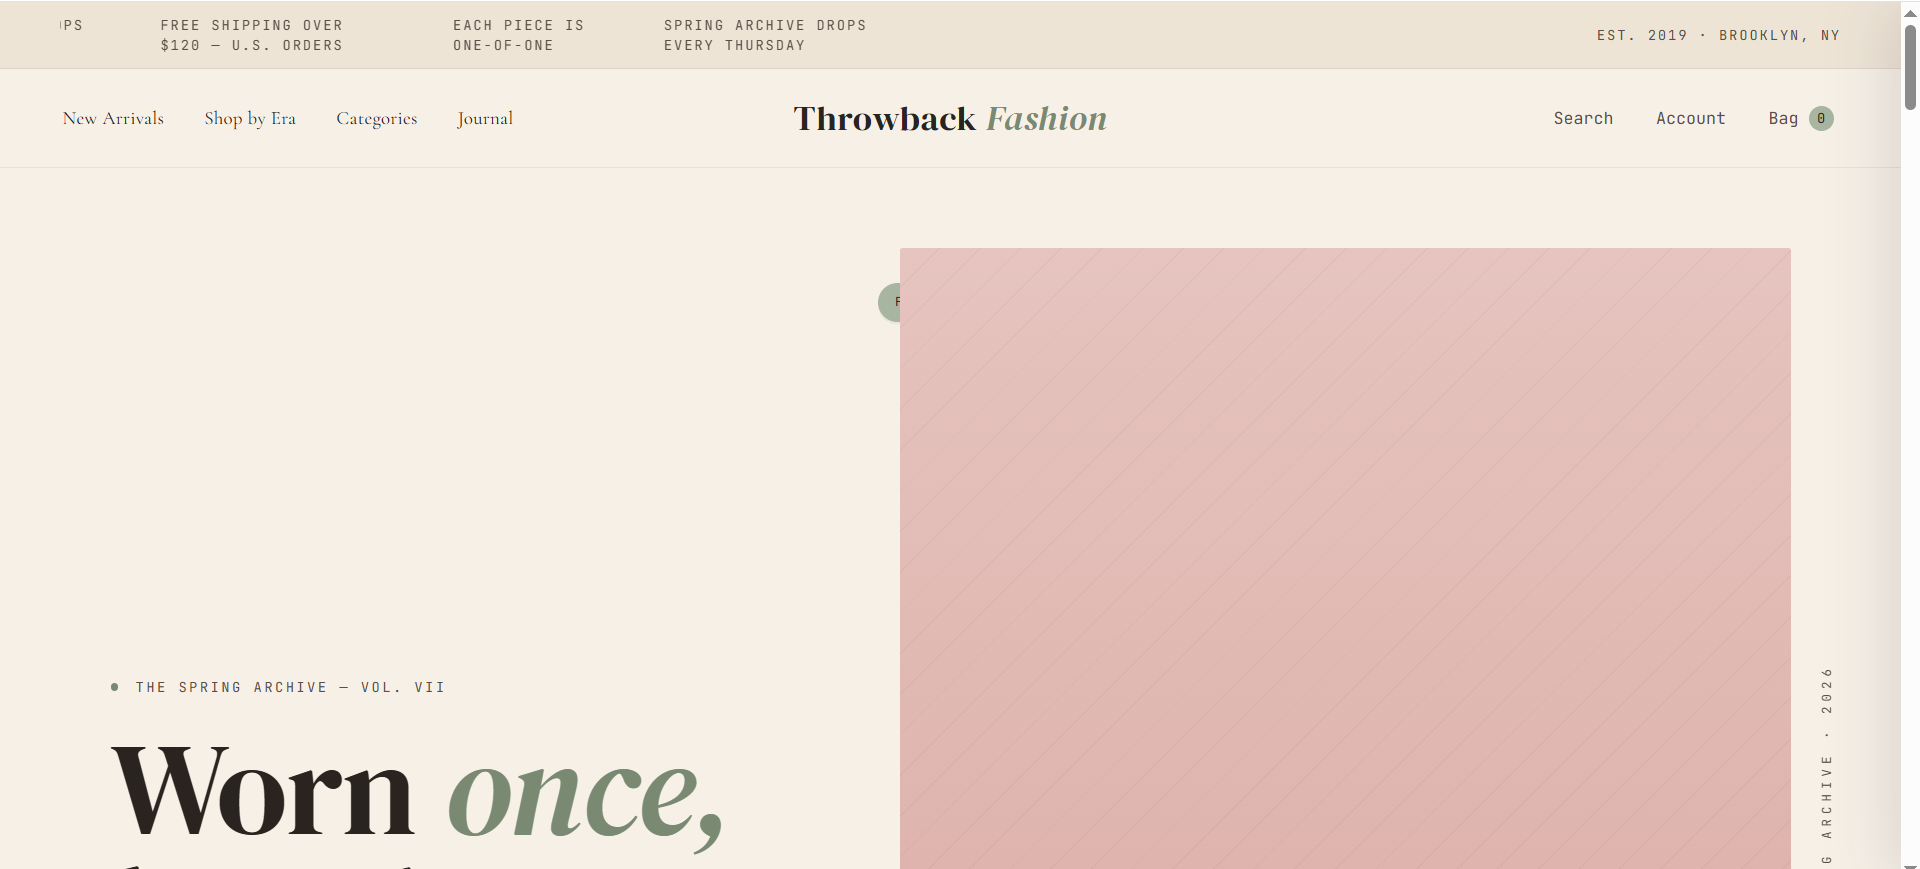
Here's the full output Claude generated with my instructions:
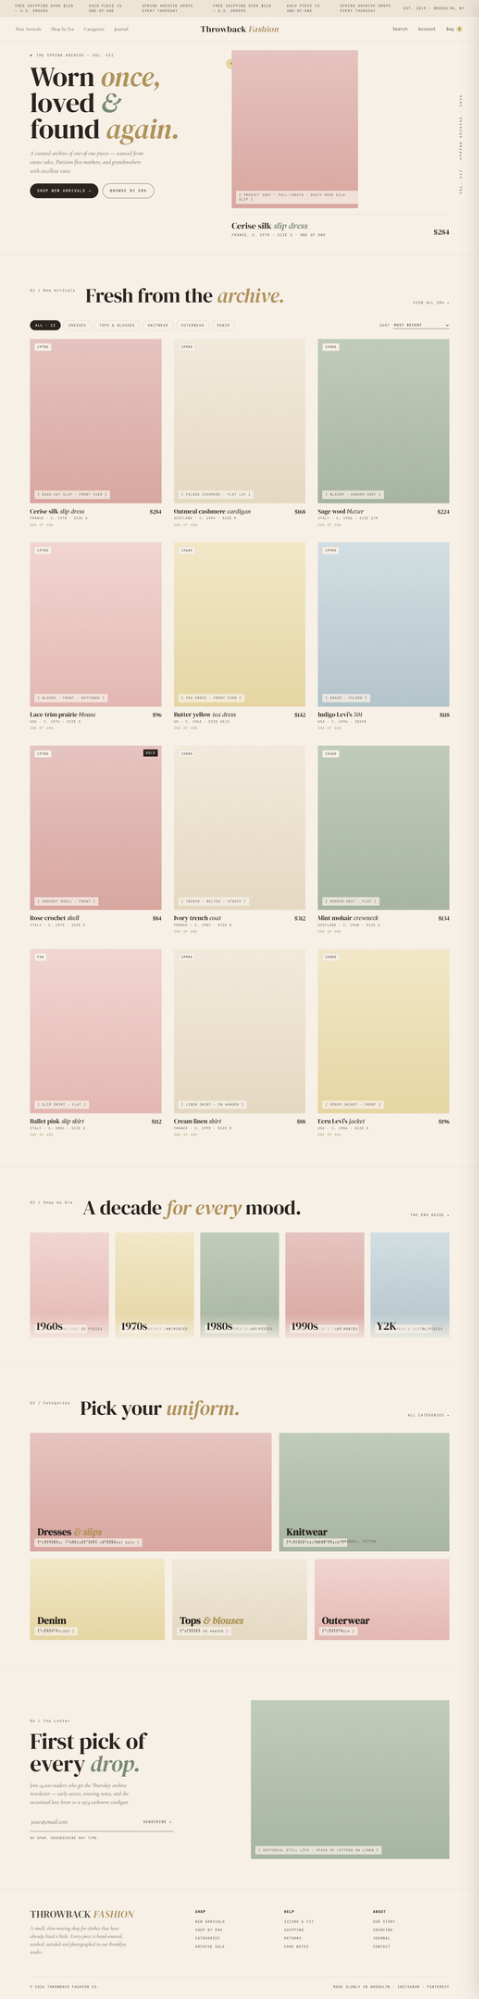
I was genuinely impressed. Claude accurately interpreted my prompts and quiz answers. The design is aesthetically pleasing and includes interactive elements like hover animation effects.
However, it did have some hiccups: part of the hero section was initially placed below the fold, for instance.
Texts also occasionally overlap, and the interactive elements trigger incorrectly or don't trigger at all. It costs extra credits to fix these errors.
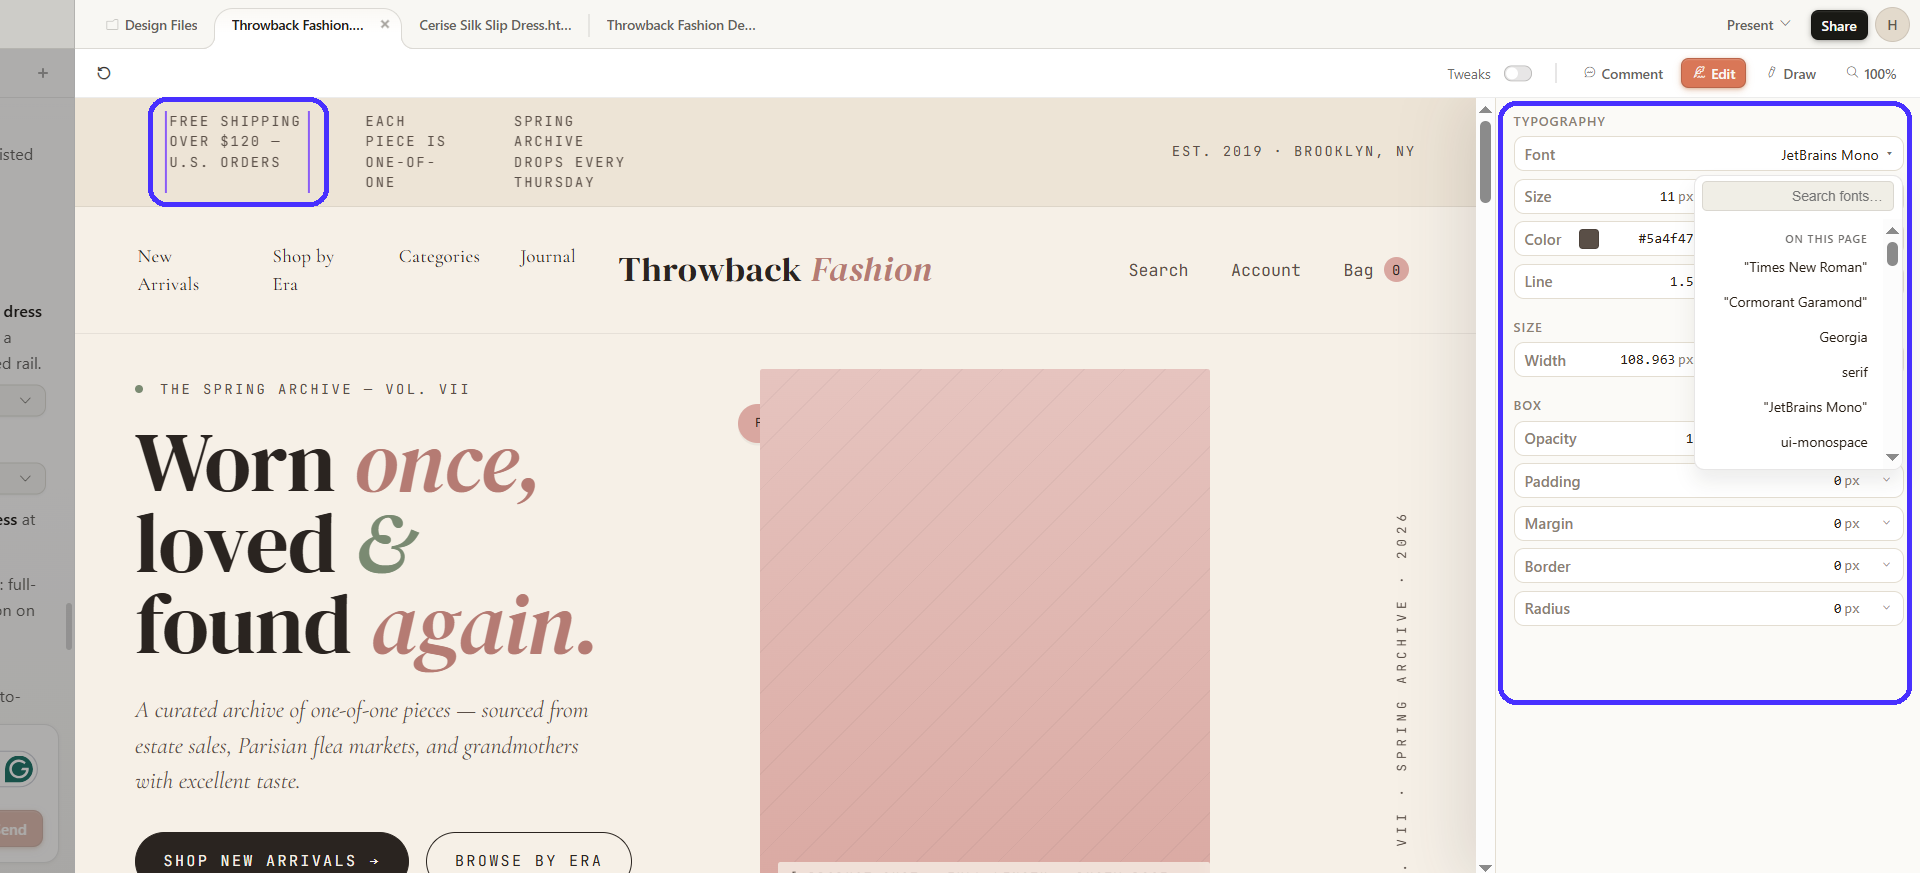
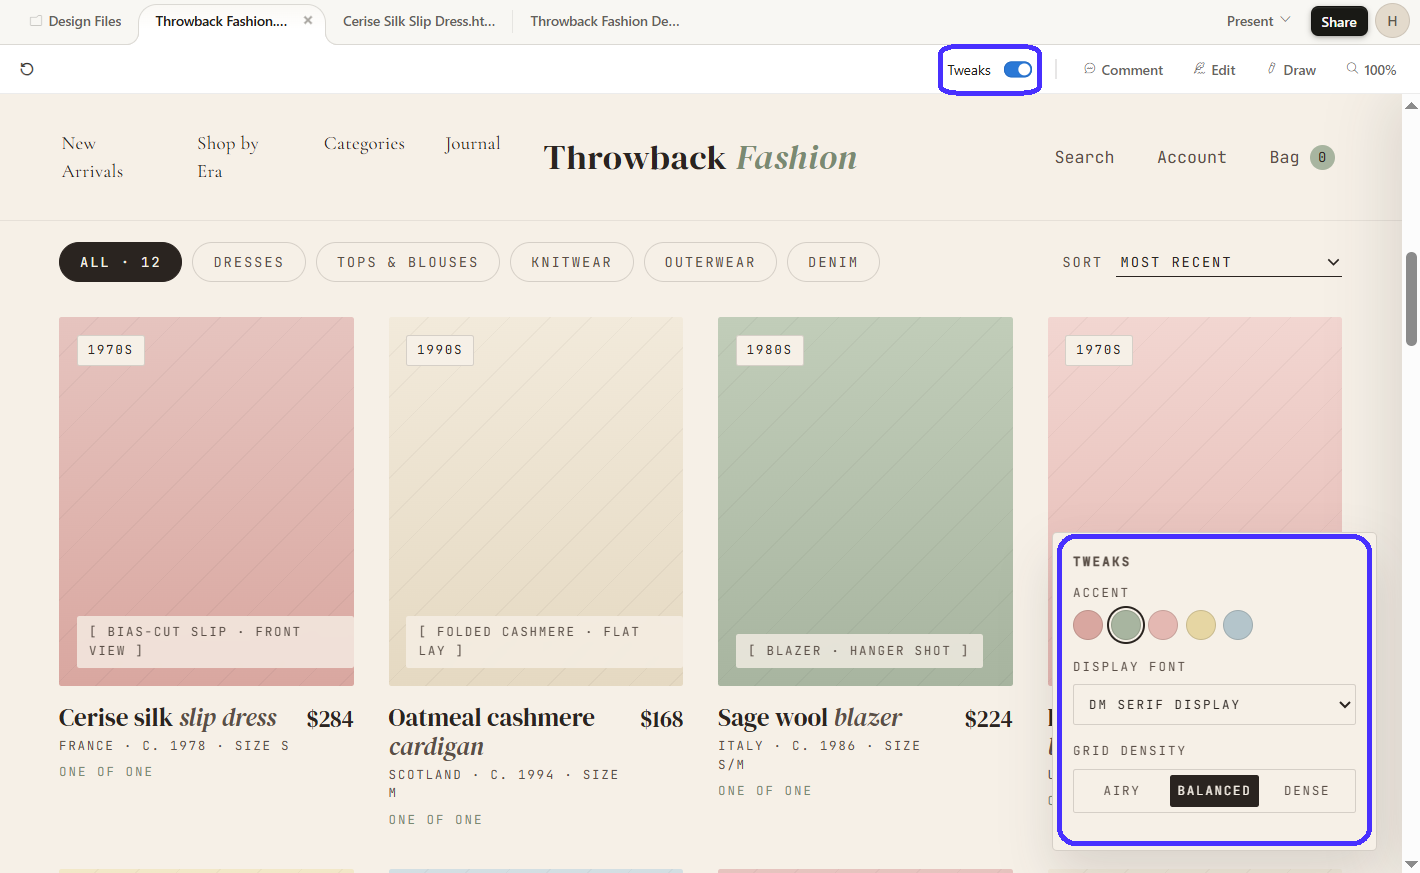
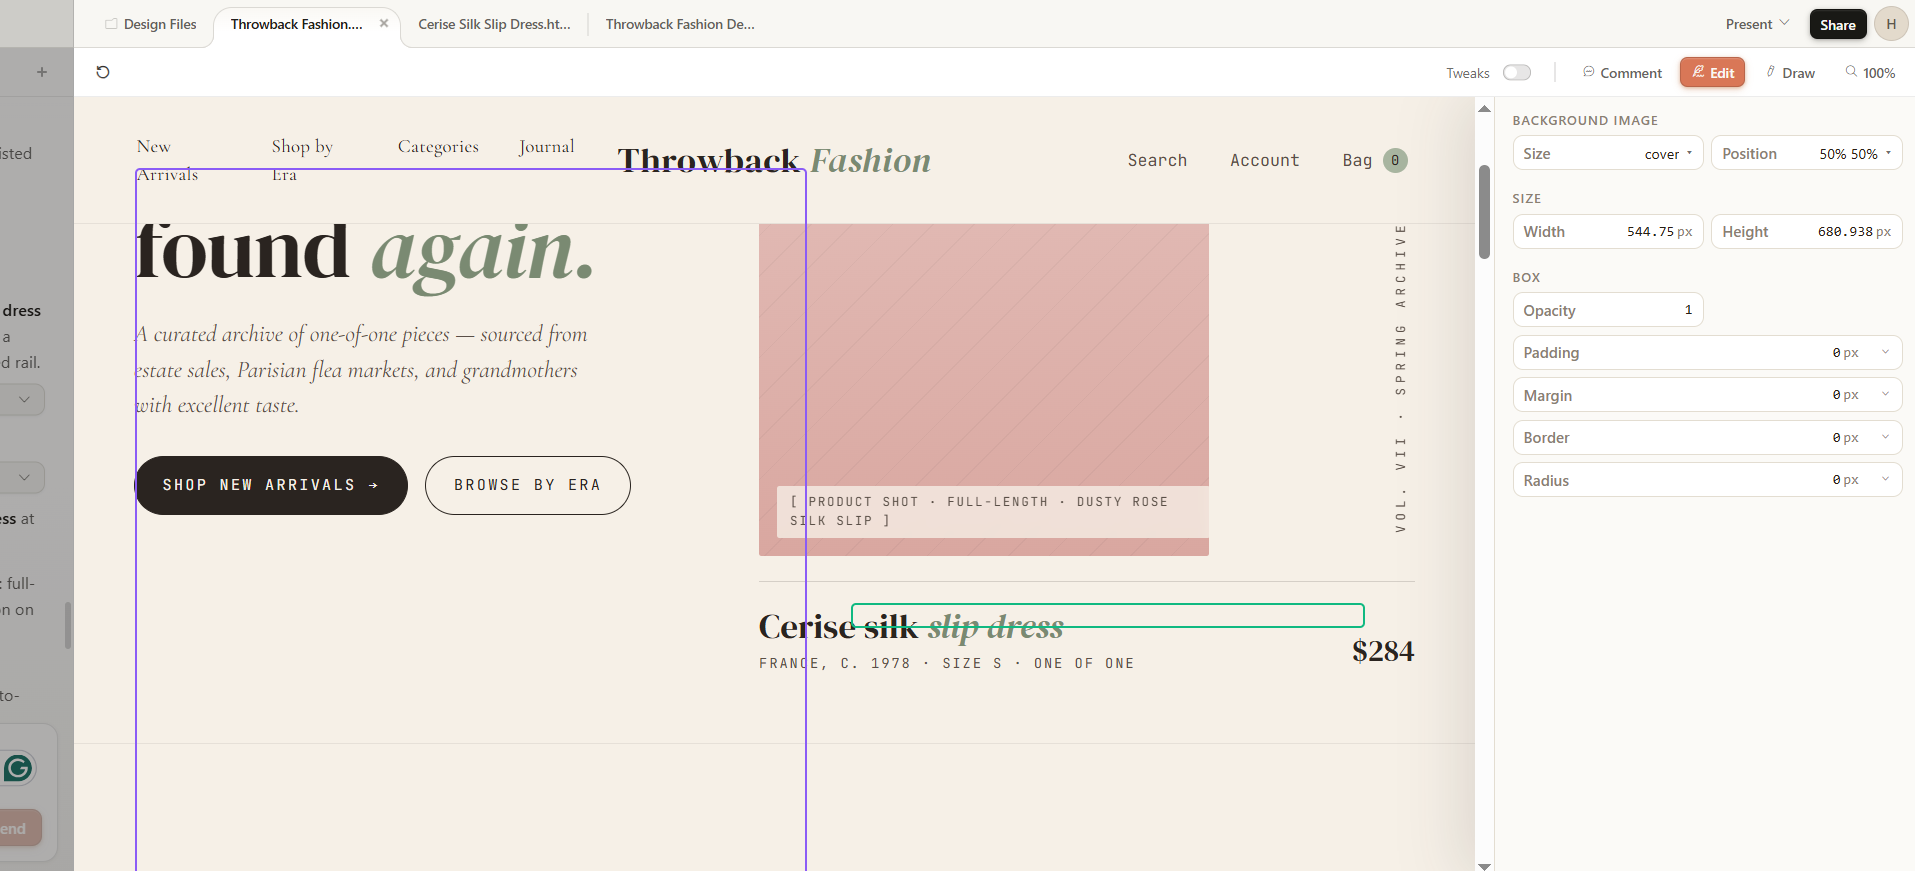
3. Refine using all four editing modes
Claude Design includes four editing options:
-
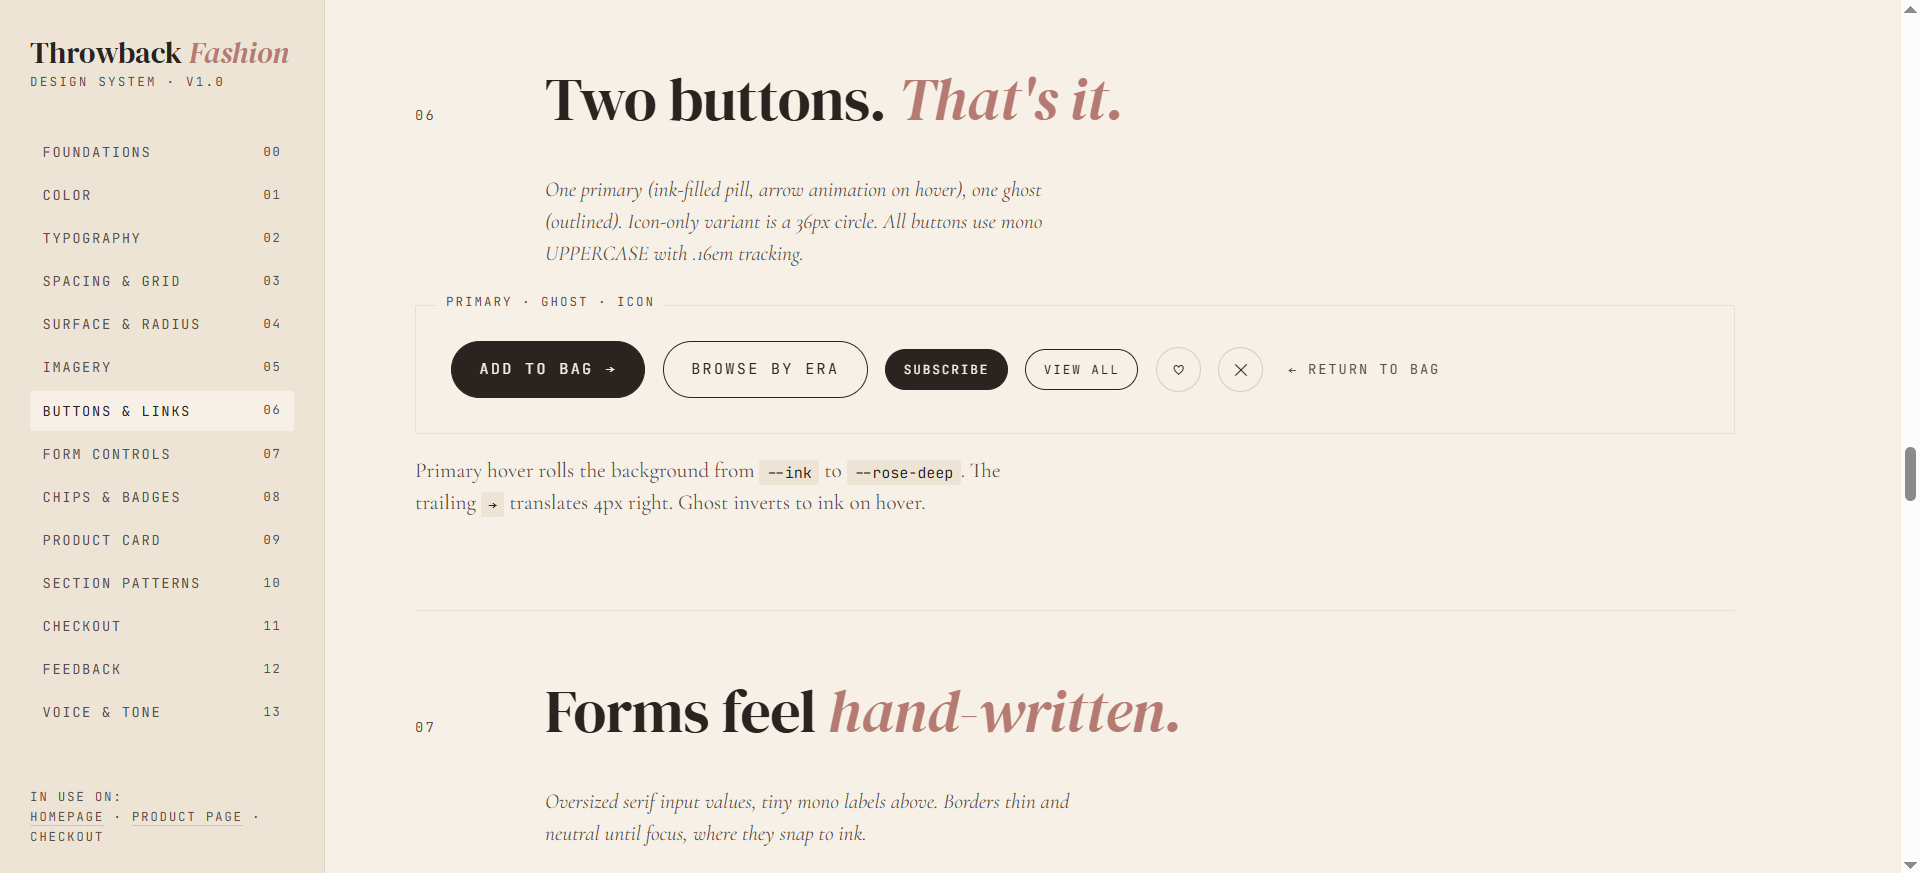
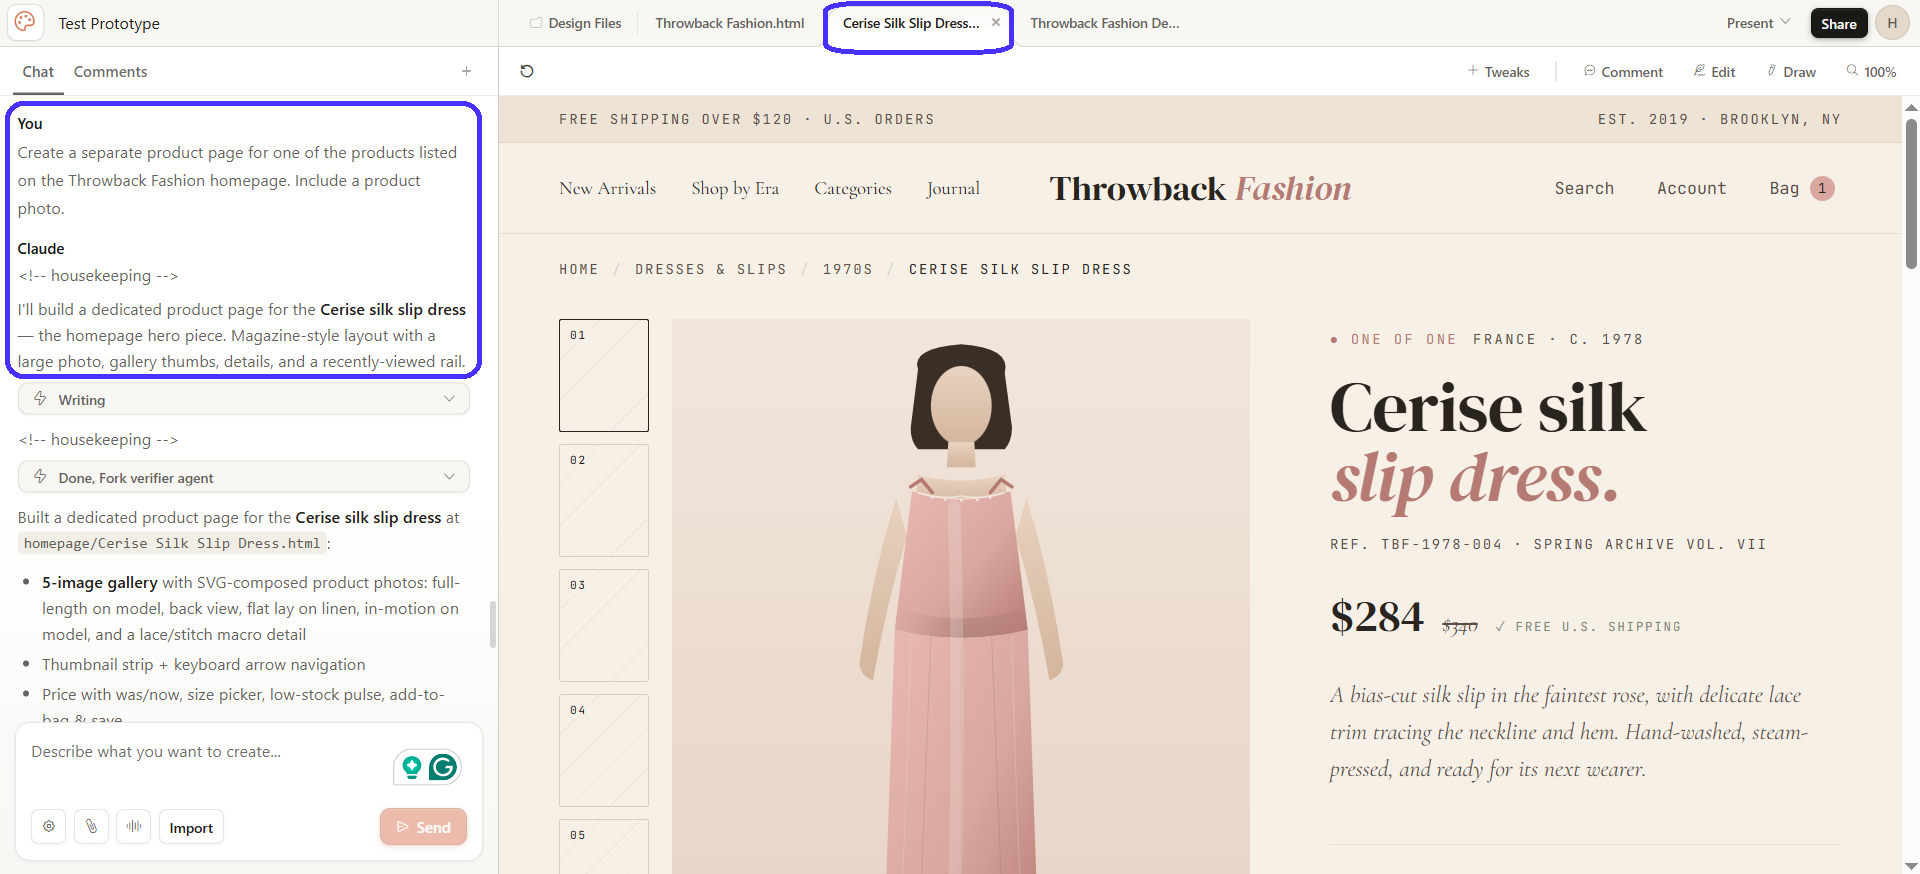
Chat-based: Ask Claude to tweak designs via the left-side chat box. Best for structural changes, like editing grid rows or columns, and expanding on the design with new sections or screens. I asked the platform to generate a separate product page based on the homescreen, for example.
-
Inline comments (also doubles as team collaboration comments): Give more specific instructions through annotated comments. Best for precise edits around particular areas, like visuals or buttons. You can also leave multiple annotations for batch edits.

-
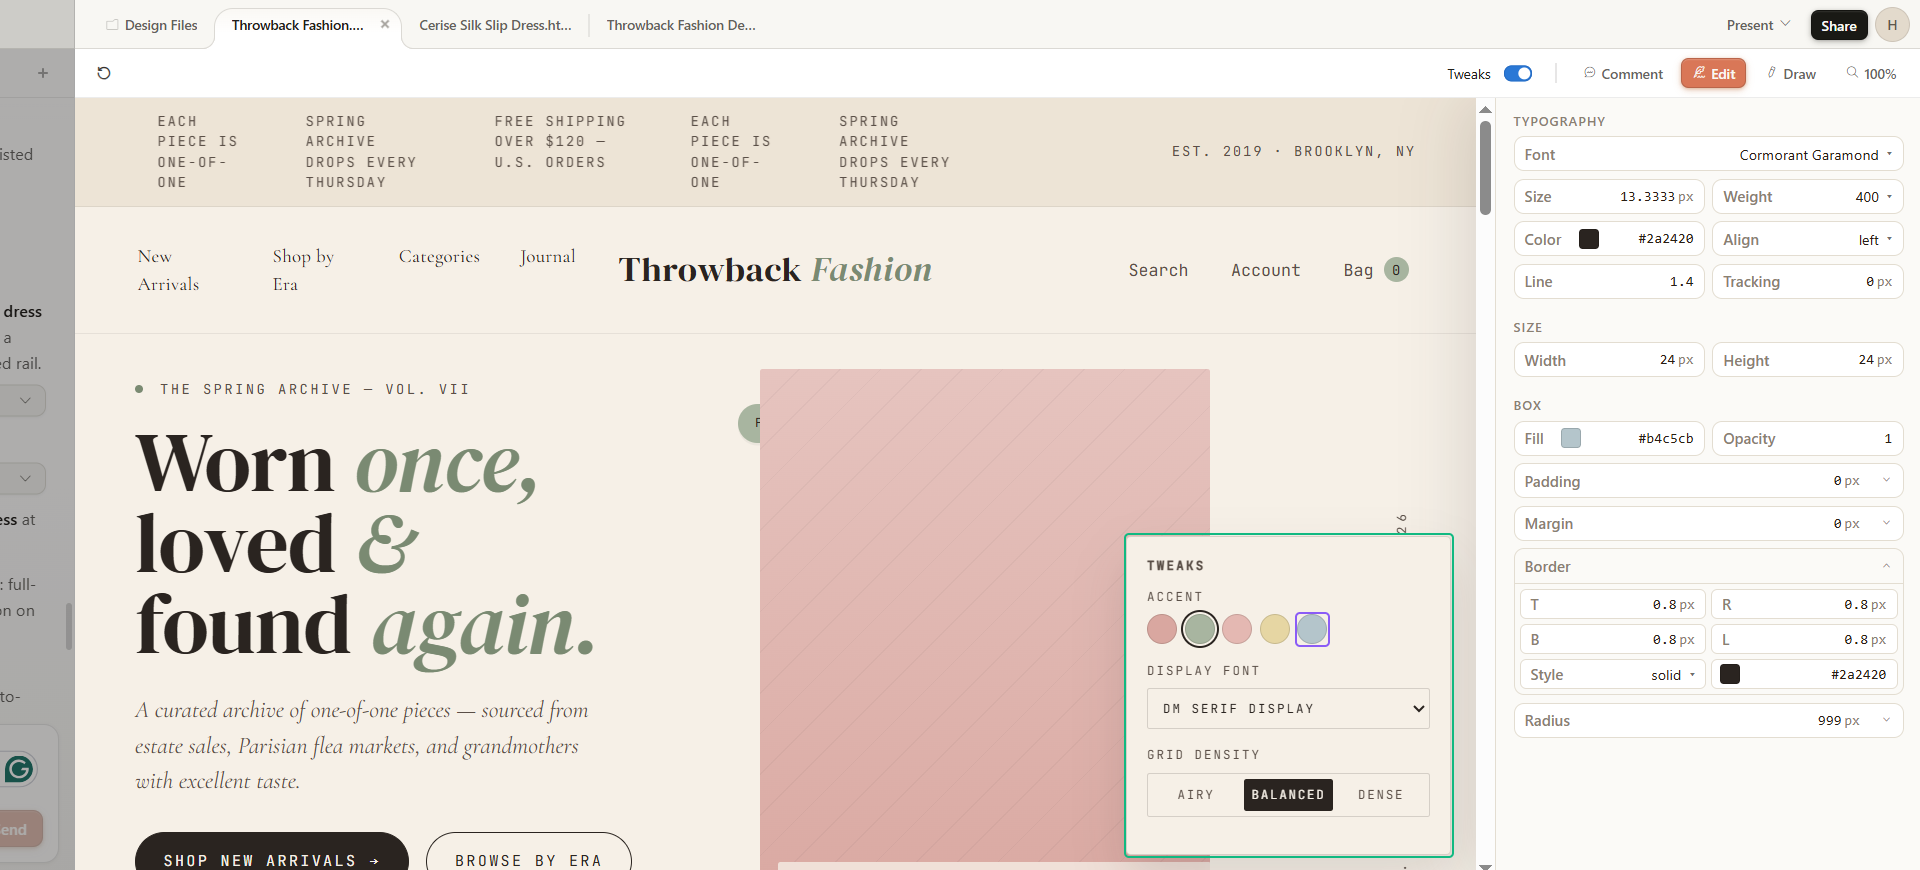
Variable-based section edits: Select pre-defined layout sections and edit them by tweaking variables. Best for fine-tuning design element placement, alignment, text typography, and more.
-
Quick tweaks: Apply quick design-wide changes, like accent colors, fonts, and grid density. Ideal for comparing multiple variations for the same design.
I personally found inline comments most effective: they're precise and perfect for fast edits in bulk.
The section editor is hit-or-miss: the selector is often imprecise. Case in point, I first wanted to use it to adjust the hero section copy (which I eventually fixed with inline comments), but the selector would always pick the entire left-hand section of the layout instead.
However, I did notice the section editor works completely fine on later designs.
Also, make sure to toggle off the Tweaks button during section edits. Claude will treat the menu options as part of the actual design.
4. Export or hand off
Claude includes multiple sharing and export options.
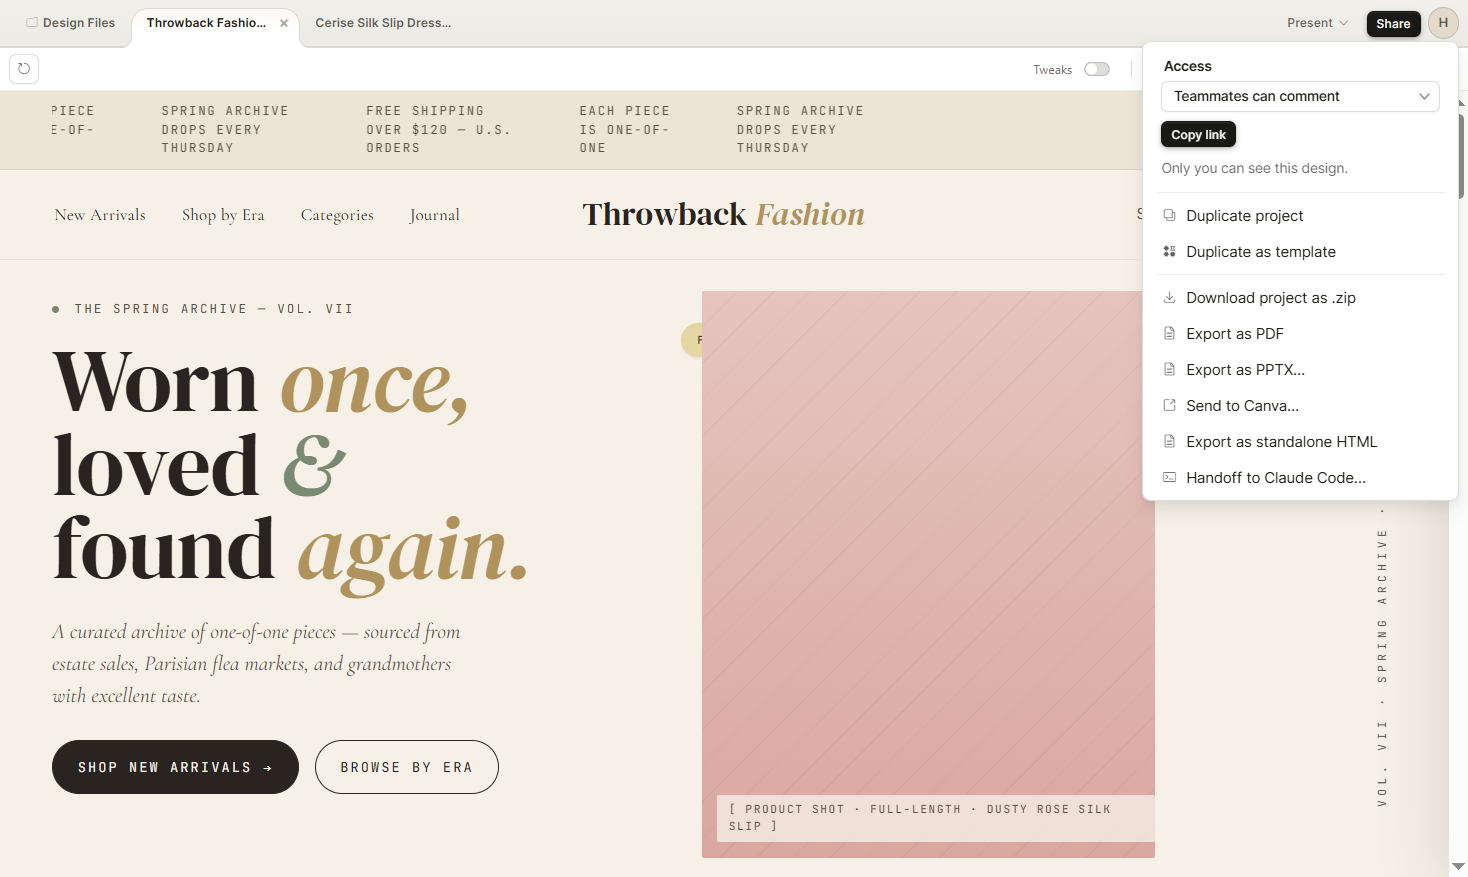
More specifically:
-
Team sharing via link with user access permissions
-
Handoff to Claude Code (local or web app)
-
Standaole HTML exports
-
Downloadable zip files
-
PDF or PPTX exports
-
Send to Canva
Of course, Calude Design-to-Code handoffs are the standout here. Claude Design generates the UI, while Claude Code builds the back end and adds real functionality to that UI for fully interactive prototypes.
You can either hand off designs to the Claude Code web app directly, as well as copy commands or download zip files to run designs on the desktop app instead.
Claude Design pricing
Claude Design requires an active Pro, Max, Team, or Enterprise Claude AI subscription, which starts at $20 per month.
It's worth noting that Anthropic tracks Claude Design usage separately from other Claude models, like Claude Code, for example.
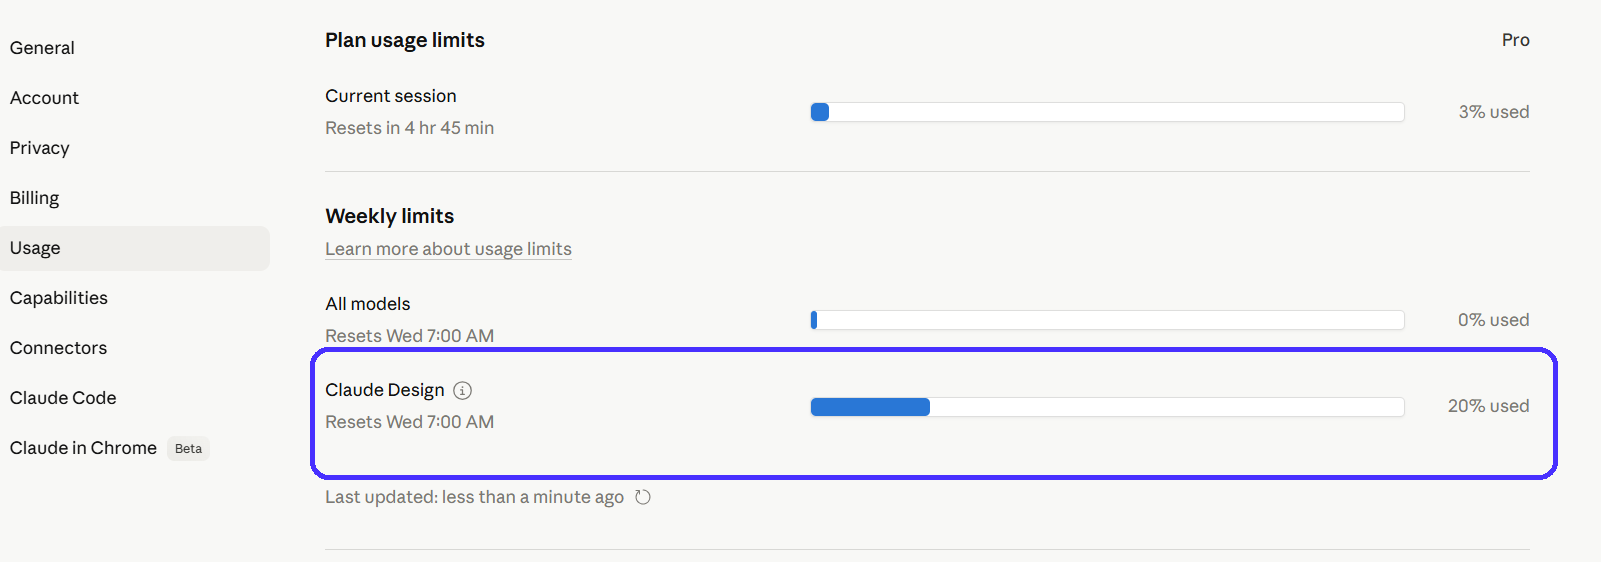
But the weekly token limits are restrictive. I ran out of weekly credits in 36 minutes with the Pro plan — that's five prompts. Other reviews report similar benchmarks.
As such, more token-heavy tasks like design system setups and Claude Code hand-offs become viable in the next plan up the pricing tier, but costs $100 per month — that's five times over the Pro plan.
Here's a brief breakdown of all the pricing packages that include Claude Design, and what each plan is best for:
|
Subscription plan |
Best for |
Pricing (monthly billing) |
|
Pro |
Non-designers, quick project idea visualization, and occasional prototyping |
$20 per month |
|
Max 5X |
Product managers and engineers, occasional mockups, simple design projects: usage limit 5 times higher than Pro plan |
$100 per month |
|
Max 20X |
Professional designers, complex design projects, and regular use: usage limit 20 times higher than Pro plan |
$200 per month |
|
Team Standard |
Marketing and product teams (5+ users), collaborative pitch deck setups, landing page mockups, one-pagers, and idea visualizations |
$20 per seat per month |
|
Team Premium |
Design and development teams (5+ users), shipping production-ready designs, complex design projects: usage limit 5 times higher than the Standard seat |
$125 per seat per month |
|
Enterpise |
Enterprise-level teams (20+ users), enhanced security, role-based access, custom data retention controls, etc. |
Upon request |
To better illustrate the platform’s real usability, here's a quick rundown of the tasks I managed to complete with Claude Design before running out of credits in the Pro package:
-
Set up a homepage prototype for an online fashion store
-
Used a prompt to fix the hero section alignment issue
-
Added an interactive four-step checkout flow to the homepage
-
Created a separate product page for one of the products listed on the homepage
-
Set up a design system with the components used to create all of the above.
I was pleasantly surprised by the amount of outputs Claude generated from these five prompts, but token consumption remains a critical pain point. $20 per month for around 35 minutes of weekly use feels underwhelming.
The price hikes between subscription plans also make Claude Design quite tricky to scale, especially for budget-conscious teams.
Where Claude Design falls short
Claude Design is promising, and I had moments where I was genuinely taken aback by its output, but it's still a work-in-progress.
Besides the token consumption-related issues and the hiccups displayed above, I encountered a few other issues you should know about before you decide whether you decide to commit to the platform.
Here are some of the most noteworthy ones:
Prolonged output generation times
Otherwise simple prompts take a while to iterate. Claude Design took around four to seven minutes per prompt to generate outputs based on my own testing, with roughly 21 minutes waiting time for four total prompts.
Long loading times can be problematic in building effective workflows in actual design scenarios.
Outputs unresponsive to content-level instructions
Claude Design reliably follows layout and style guide instructions, but I noticed it occasionally struggles with content placement and distinguishing between asset types, like images and illustrations.
Texts often overlap, while I specifically instructed Claude to implement a photo for a product page, but it went for an illustration instead:
Limited design-specific features
Claude Design lacks a pixel-perfect manual editor, which is a big drawback. It limits the ability to move from concept to production without external tools, especially since Claude Design also does not include native Figma exports. Figma has a 98% adoption rate in the software design space, so lacking native Figma exports can be a deal-breaker for most design teams.
You can transfer Claude Design projects through Claude Code, and then to Figma, but that takes a while. UX Pilot’s Figma Agent does make this process a little easier: you can copy/paste Claude Code links into the Figma agent, and the platform then replicates the design directly in Figma.
Unlike other AI design tools, Claude also currently lacks UX research features like predictive heatmaps, automated accessibility audits, or usability scores. This can increase the risk of generating layouts that don't have much usability in real-life scenarios.
Summing up: Claude Design is a solid option for users with limited design backgrounds looking to set up quick projects, while professional designers will find it useful for project ideation. But the platform has occasional hiccups, slow output generation times, limited design features, restrictive token limits, and no native Figma integration.
These factors combined may make it unsuitable for large-scale design projects.
Claude Design and UX Pilot
Despite its drawbacks, Claude Design works especially well when coupled with other specialized design tools like UX Pilot. UX Pilot is an AI UI/UX platform specialized in rapid wireframing, high-fidelity prototyping, and screenflow generation.
UX Pilot stands out through its automated heatmaps and accessibility reporting features: they predict attention hotspots, identify and fix any accessibility issues based on WCAG 2.1 guidelines.
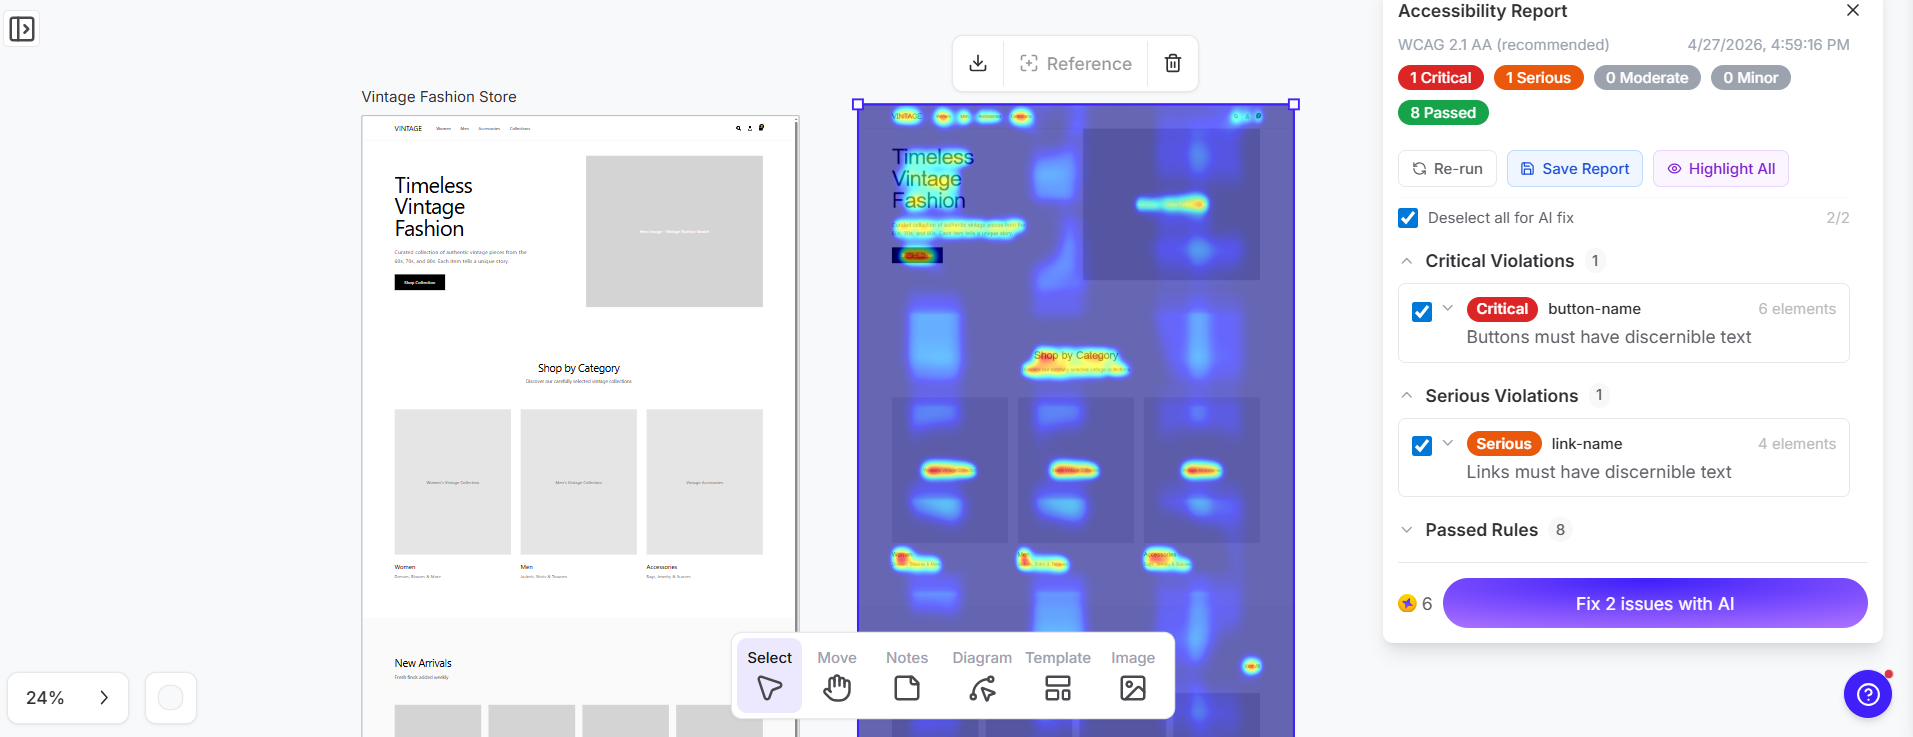
These features ensure all generated outputs are based on UX design and usability best practices, and help guide design decisions that bring real value to the end users.
That means UX Pilot and Claude Design can unify entire design processes, from initial wireframing to final implementation.
Here’s how you can do it in five easy steps:
-
Open UX Pilot to generate readily optimized wireframes, screenflows, or prototypes to visualize product ideas.
-
Validate them through the platform’s accessibility audits and predictive heatmaps.
-
Handle edits via its manual, chat-based section editor, or Figma plugin.
-
Transfer UX Pilot projects to Claude Design to turn wireframes into interactive prototypes for design exploration.
-
Add extra interactions to simulate user behavior, and hand off projects to Claude Code for implementation.
This way, you'll ensure your project's foundation is optimized for proper usability through UX Pilot, while Claude Design and Code build on that foundation to bring your projects as close to production readiness as possible.
The same goes for the opposite: create UI layouts with Claude Design, validate them for usability and accessibility through UX Pilot, and make extra-precise edits through the native Figma integration.
Is Claude Design worth it?
Claude Design is worth it if you're:
-
A non-designer looking to get from idea to prototype fast or generate marketing assets
-
A designer looking to explore extra design directions or speed up production readiness via Claude Code
The amount of work it can put in with just a single prompt is impressive, while its design system setups can distinguish generated layouts from generic AI outputs, which is perfect for ideation and kick-starting projects in early design stages.
But remember that Claude Design is still an early-access product. It has its bugs, quirks, and limitations — factors that don't necessarily make it a viable asset in actual design workflows.
As such, Claude Design is solid as long as you go into it with the right expectations.
If you're looking to double down on AI and make it a central part of your design workflows, pair UX Pilot with Claude: they complement each other well, and can significantly speed up end-to-end workflows. Claude generates the prototype, while UX Pilot's accessibility and usability scores tell you whether that prototype will work well in real use-case scenarios.
If you're a current Figma user who sees pixel-perfect editing and multiplayer collaboration as non-negotiable, there's not much reason to switch to Claude, as the platform currently lacks these functionalities.
But you can still use AI to speed up wireframing and prototyping workflows through UX Pilot's Figma plugin. You can generate quick wireframes and prototypes in UX Pilot, and transfer them to Figma for fine-tuning in just a few clicks.
Plus, you can get started with UX Pilot completely for free right here!