Figma AI Guide for Beginners: Step by Step Guide


Divya Singh
Created on Sep 30, 2025
When I first opened Figma, it felt like stepping into a huge playground with no idea where to start. So many tools, so many options.
But once you get the hang of it, Figma is surprisingly simple. You don’t need downloads, and real-time collaboration makes designing with your team smooth.
In this guide, I’ll walk you through the basics, step by step, and show you how to use Figma AI to create digital apps and products.
What is Figma AI?
Figma AI is an intelligent design assistant built into Figma that automates repetitive tasks and provides smart suggestions to speed up the design process. Figma's AI features use machine learning to help you generate layouts, edit content, and improve designs within the same workspace.
With Figma AI, you can:
-
generate text, UI layouts, or design elements with prompts
-
Adjust designs automatically, like renaming layers or applying consistent styles
-
Get suggestions for improving spacing, hierarchy, and visual balance
These tools are integrated directly into the design environment, accessible via a star icon in the toolbar, and are designed to assist at various stages of the design process from initial concepts to interactive prototypes and content creation.
Figma's AI features can help speed up a traditional design workflow by automating tedious tasks and giving designers more room to refine ideas and experiment with layouts.
10 Figma AI features
Here’s a quick overview of each feature and what it does.
-
Figma’s First Draft converts a text prompt into a fully editable mockup within minutes. It’s ideal for exploring layout ideas quickly without manually building every element.
-
The Rename Layers feature uses AI to automatically rename layers based on their content and structure. This makes large and complex design files easier to manage.
-
Replace Content updates existing text automatically. You can refine the result with a prompt if needed, which is useful for fast, large-scale content edits.
-
With Duplicate with New Content, you can drag a handle on an Auto Layout frame to duplicate elements. Figma generates new text for each duplicated element which is perfect for expanding repeating blocks.
-
The Make an image feature lets you generate or edit visuals directly inside Figma using text prompts. You can quickly add hero sections, avatars, or product shots without switching tools.
-
Remove Background isolates subjects from their backgrounds in seconds. It’s useful for quick edits like product shots, avatars, or thumbnails.
-
Rewrite this helps you transform text inside your designs. You can change tone, expand or shorten content, or generate new copy from scratch.
-
The Translate Text feature localizes your designs with one click. It translates entire frames while maintaining layout and styling.
-
Shorten Text condenses long copy to fit in tight spaces, such as buttons, cards, or mobile layouts. The meaning stays clear while the design remains clean.
-
Add interaction links to selected frames automatically to build basic navigation flows. This saves time when setting up prototypes and lets you focus on refining user journeys.
How to use Figma AI
Now that you have an overview of these features, let's see how you can use AI inside your Figma design file.
1. Set up Figma AI
Log in to your Figma account and look for the main dashboard. Here, you’ll find your recent files, drafts, and team projects in one place. This is where you’ll access and use Figma AI features.
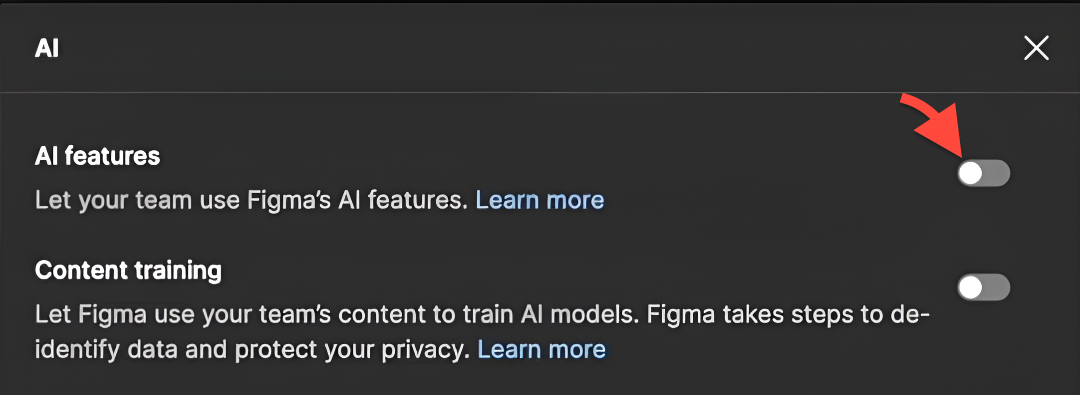
You can enable and access Figma AI features directly from your team settings.
Note that Figma AI is only available on paid plans with a full seat, so make sure that’s set up first.
-
Click the dropdown arrow next to your team name and select View settings
-
Select Manage AI settings
-
Toggle on AI features to activate Figma AI.
You can then open the Actions menu by clicking the sparkles icon in the toolbar or using Command + K / Control + K.
Here's where you'll find a range of AI tools for text editing, image generation, background removal, content replacement, and more inside the menu.
Let's dive into each of these tools.
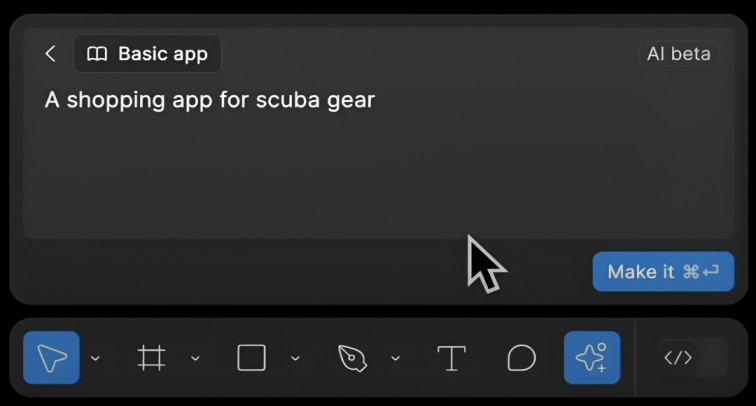
2. First Draft: from prompts to mockups
Figma’s First Draft feature converts a simple prompt into a fully editable mockup in minutes. It’s perfect for quickly exploring layout ideas without manually building every element.
-
Click the actions icon in the toolbar and select First Draft from the menu
-
Pick a component library from the available options to set the structure of your mockup.
-
Enter your prompt in the text box describing the screen or app you want to create and hit Make it.
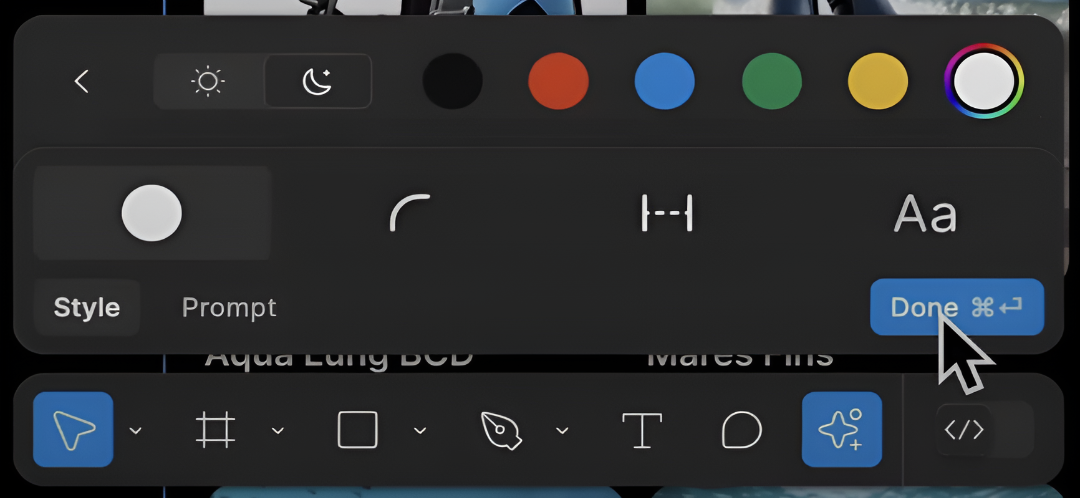
Figma will generate a high-fidelity mockup, complete with auto-layout and organized layers. You can then review the result and make edits directly inside Figma's canvas.
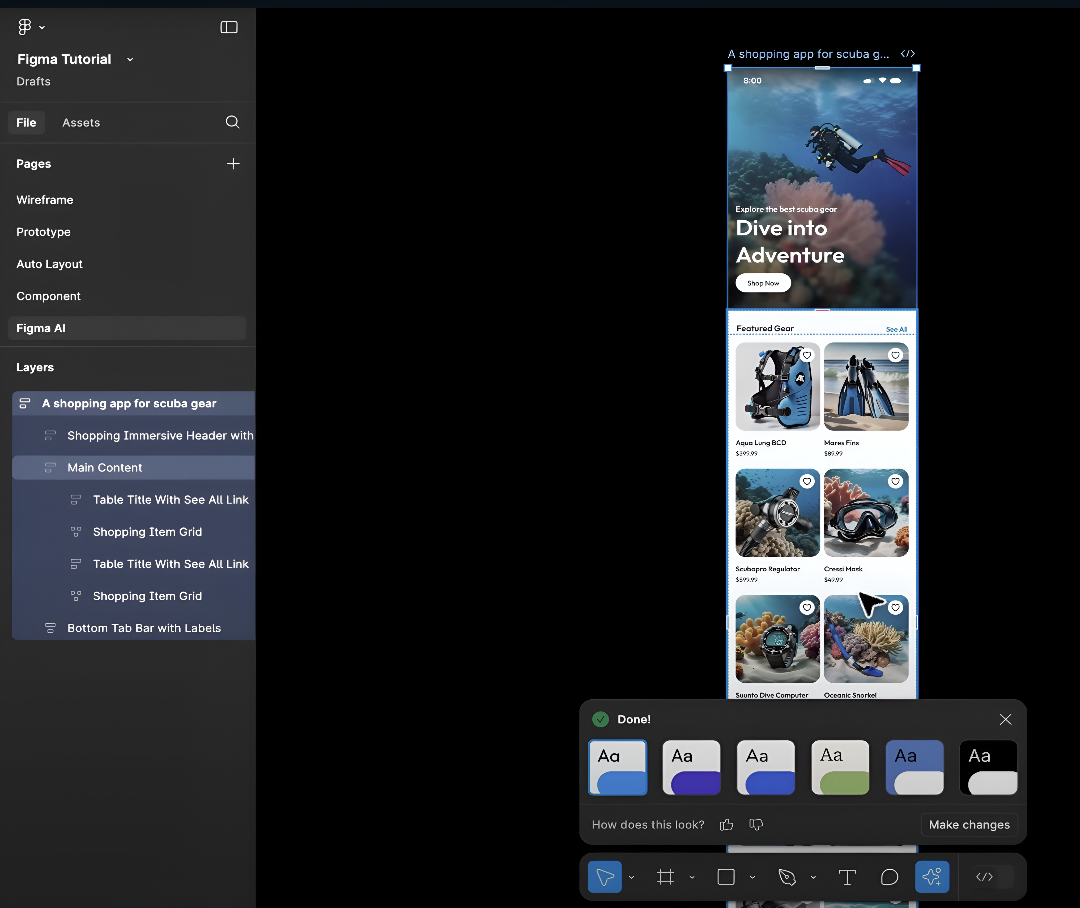
Use the control panel at the bottom to add your brand colors, edit design spacing, and text. Of course, you can also prompt your design changes, and Figma will make the edits.
Remember that this feature mainly generates individual screens and doesn’t support creating multi-screen flows.
It also has limitations when it comes to producing complex or highly customized designs, as it works best with straightforward designs and components.
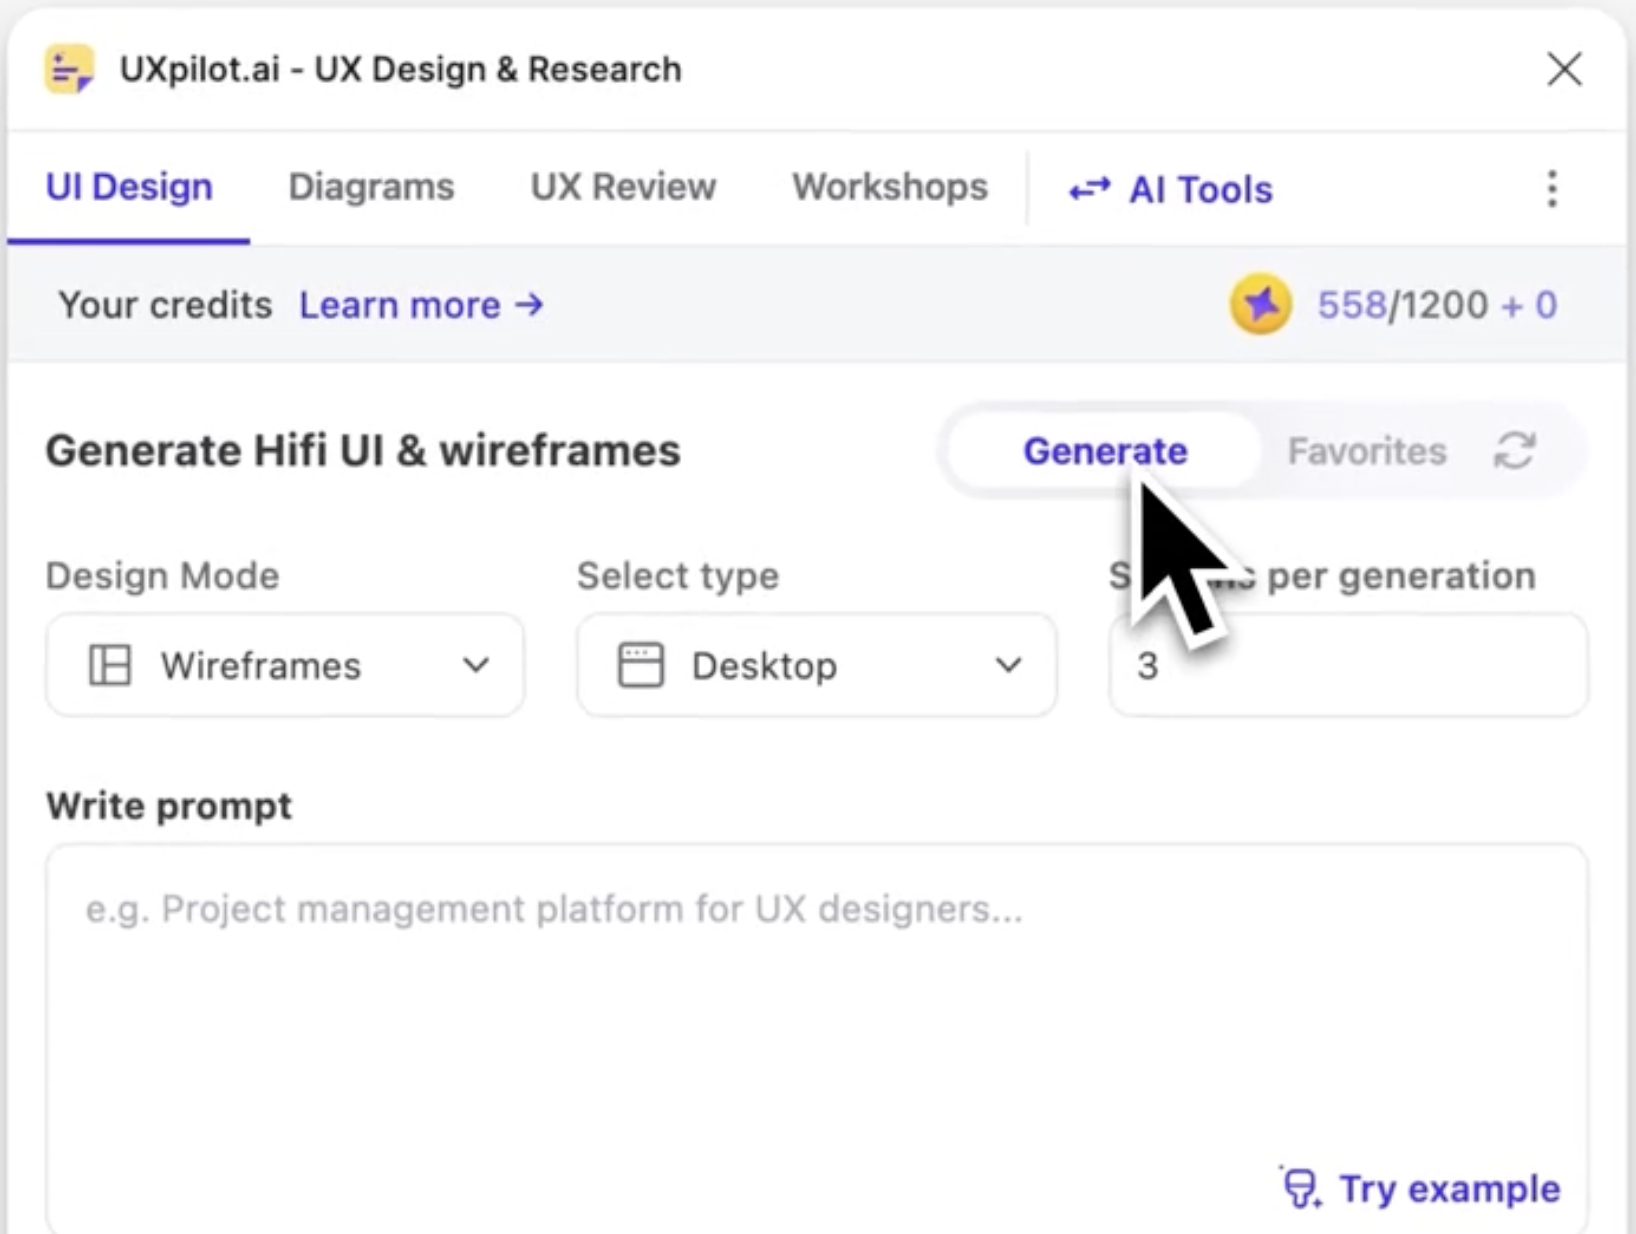
Check out a high fidelity AI designer like UX Pilot if you're looking to generate multiple screens and build complex apps quickly.

3. Rename Layers
Figma’s Rename Layers feature uses AI to clean up messy files by automatically renaming layers based on their content and structure.
This is a handy feature that brings order to complex designs and keeps your files easy to navigate. I dont know about you, but I'd rather focus on my design than having to think about naming my layers.
Although it's good practice to maintain a consistent naming convention, it's easy to lose track of it. To use Figma's renaming feature,
-
Click the Actions icon in the toolbar and select Rename layers
-
Select the specific layers you want to rename, or select the entire frame to rename everything at once

The AI will generate clear, contextual names for each selected layer. You can also manually rename a single layer if needed
This feature intelligently detects each layer’s purpose and assigns appropriate names with a single click.
I especially like that using this avoids renaming layers that are manually named, hidden, locked, or embedded within component instances.
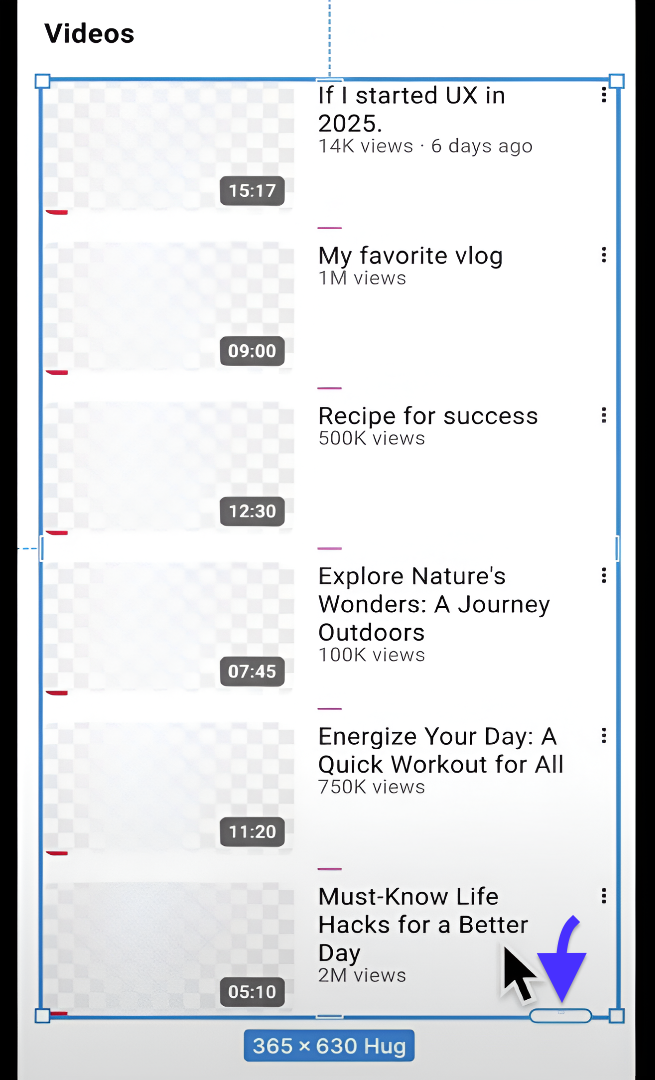
4. Replace Content
Figma AI’s Replace Content feature lets you change or update existing text without writing a prompt. You can replace existing text with new, auto-generated content in a single click, and if you’re not happy with the result, you can refine it using a prompt.
-
Click the Actions icon in the toolbar and select Replace content.
-
Select the elements or entire frame you want to update. Then, click Replace Content.
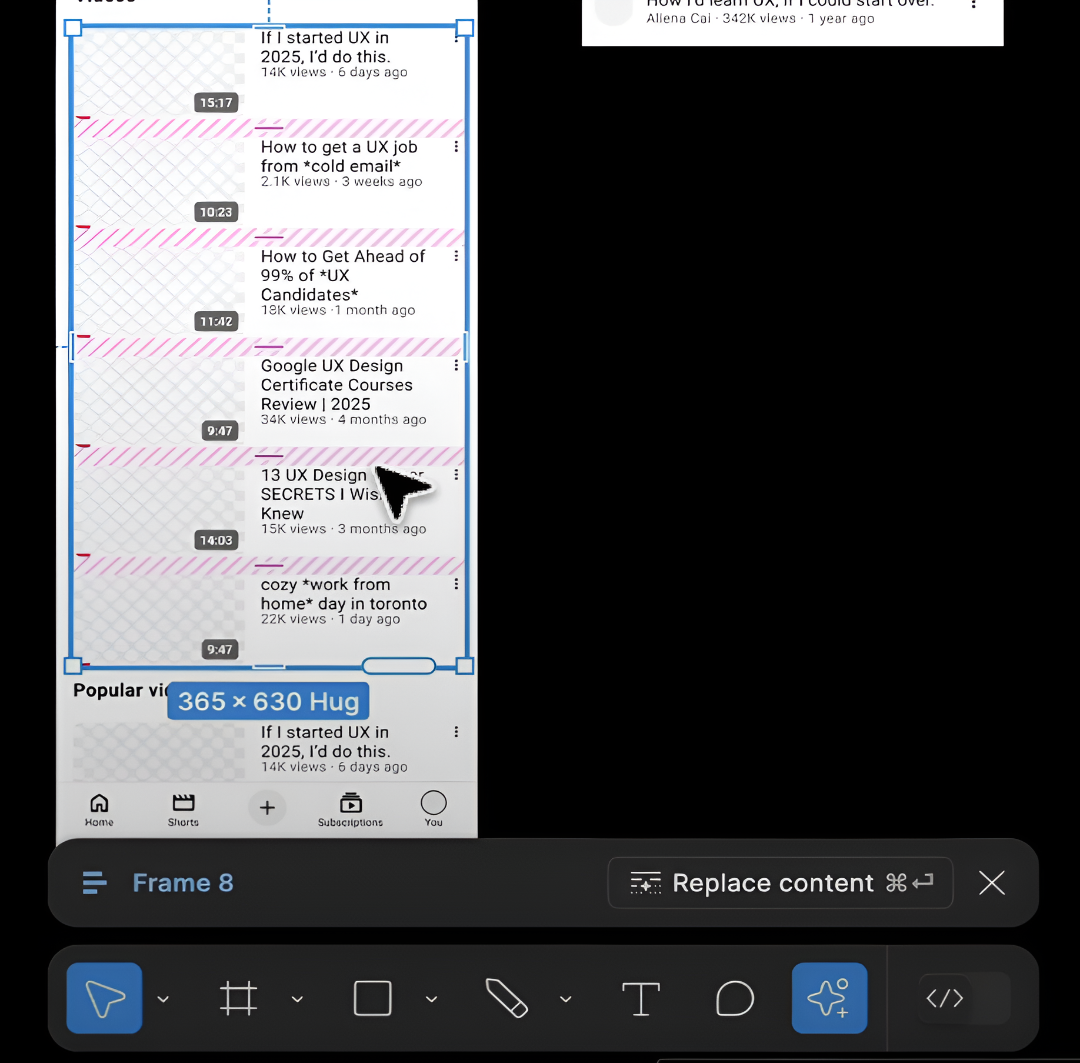
Or provide specific instructions in the prompt.
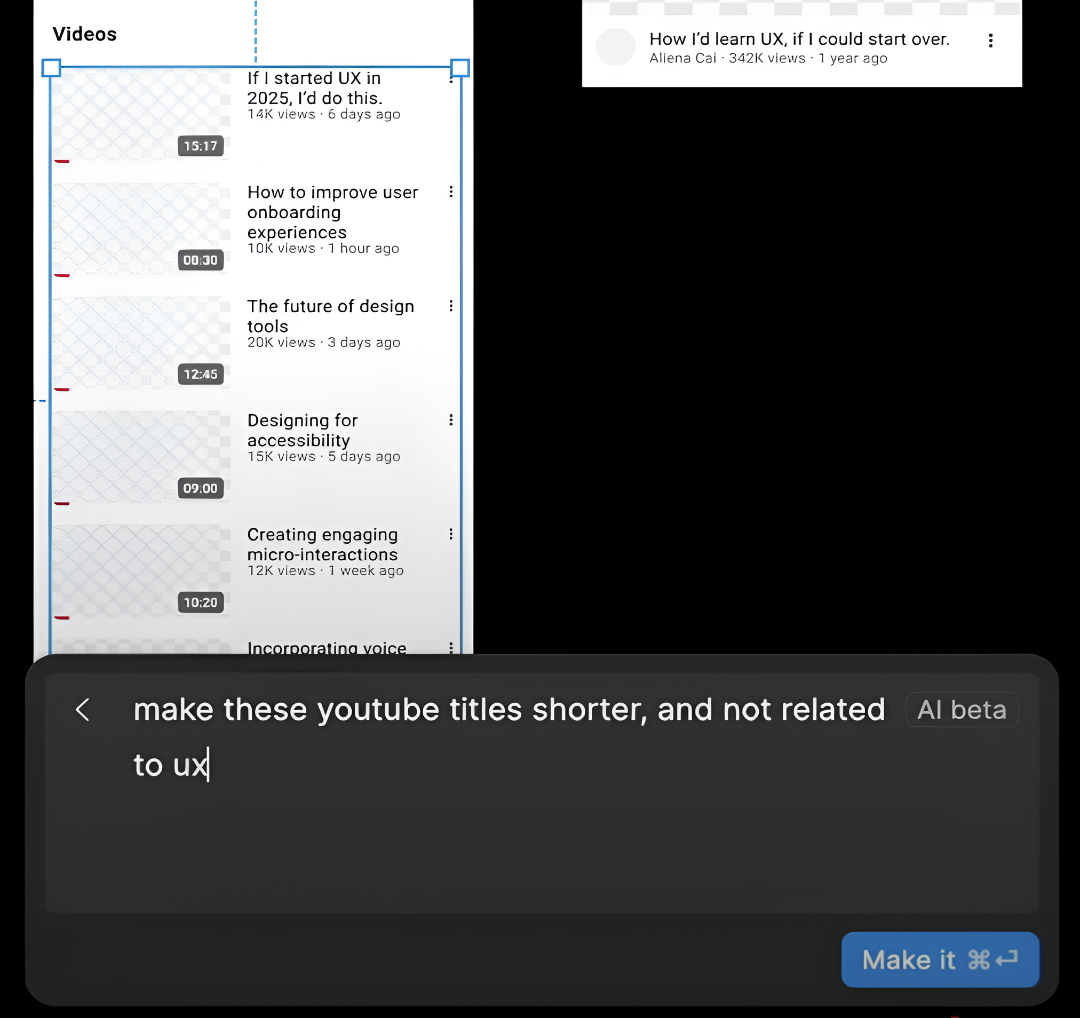
This feature is useful when you want to make fast copy replacements across multiple components, while still retaining relevance to your overall design.
5. Duplicate with New Content
Figma AI’s Duplicate with New Content feature lets you drag your original layout to generate the same design with new and unique text content.
It’s useful when you’re working with repeating blocks or lists and want to expand them quickly without manually editing each one.
-
Hover over the Auto Layout frame that contains your repeating elements.
-
Click and drag the handle in the bottom-right corner of the frame to extend the layout.
Figma will automatically duplicate the elements and generate new content for each item, while maintaining the original structure intact.
You can quickly scale content-heavy layouts in seconds as Figma automatically fills in realistic new copy. This works well for lists, cards, or repeating grids.
However, it doesn’t support Auto Layout elements inside components, so you’ll need to detach those elements before using it.
5. Generate and edit images
The Make an image feature lets you create original visuals directly inside Figma or modify existing ones with simple text commands.
-
Click the Actions icon in the toolbar and select Make an image.
-
Type a clear prompt describing the image you want.
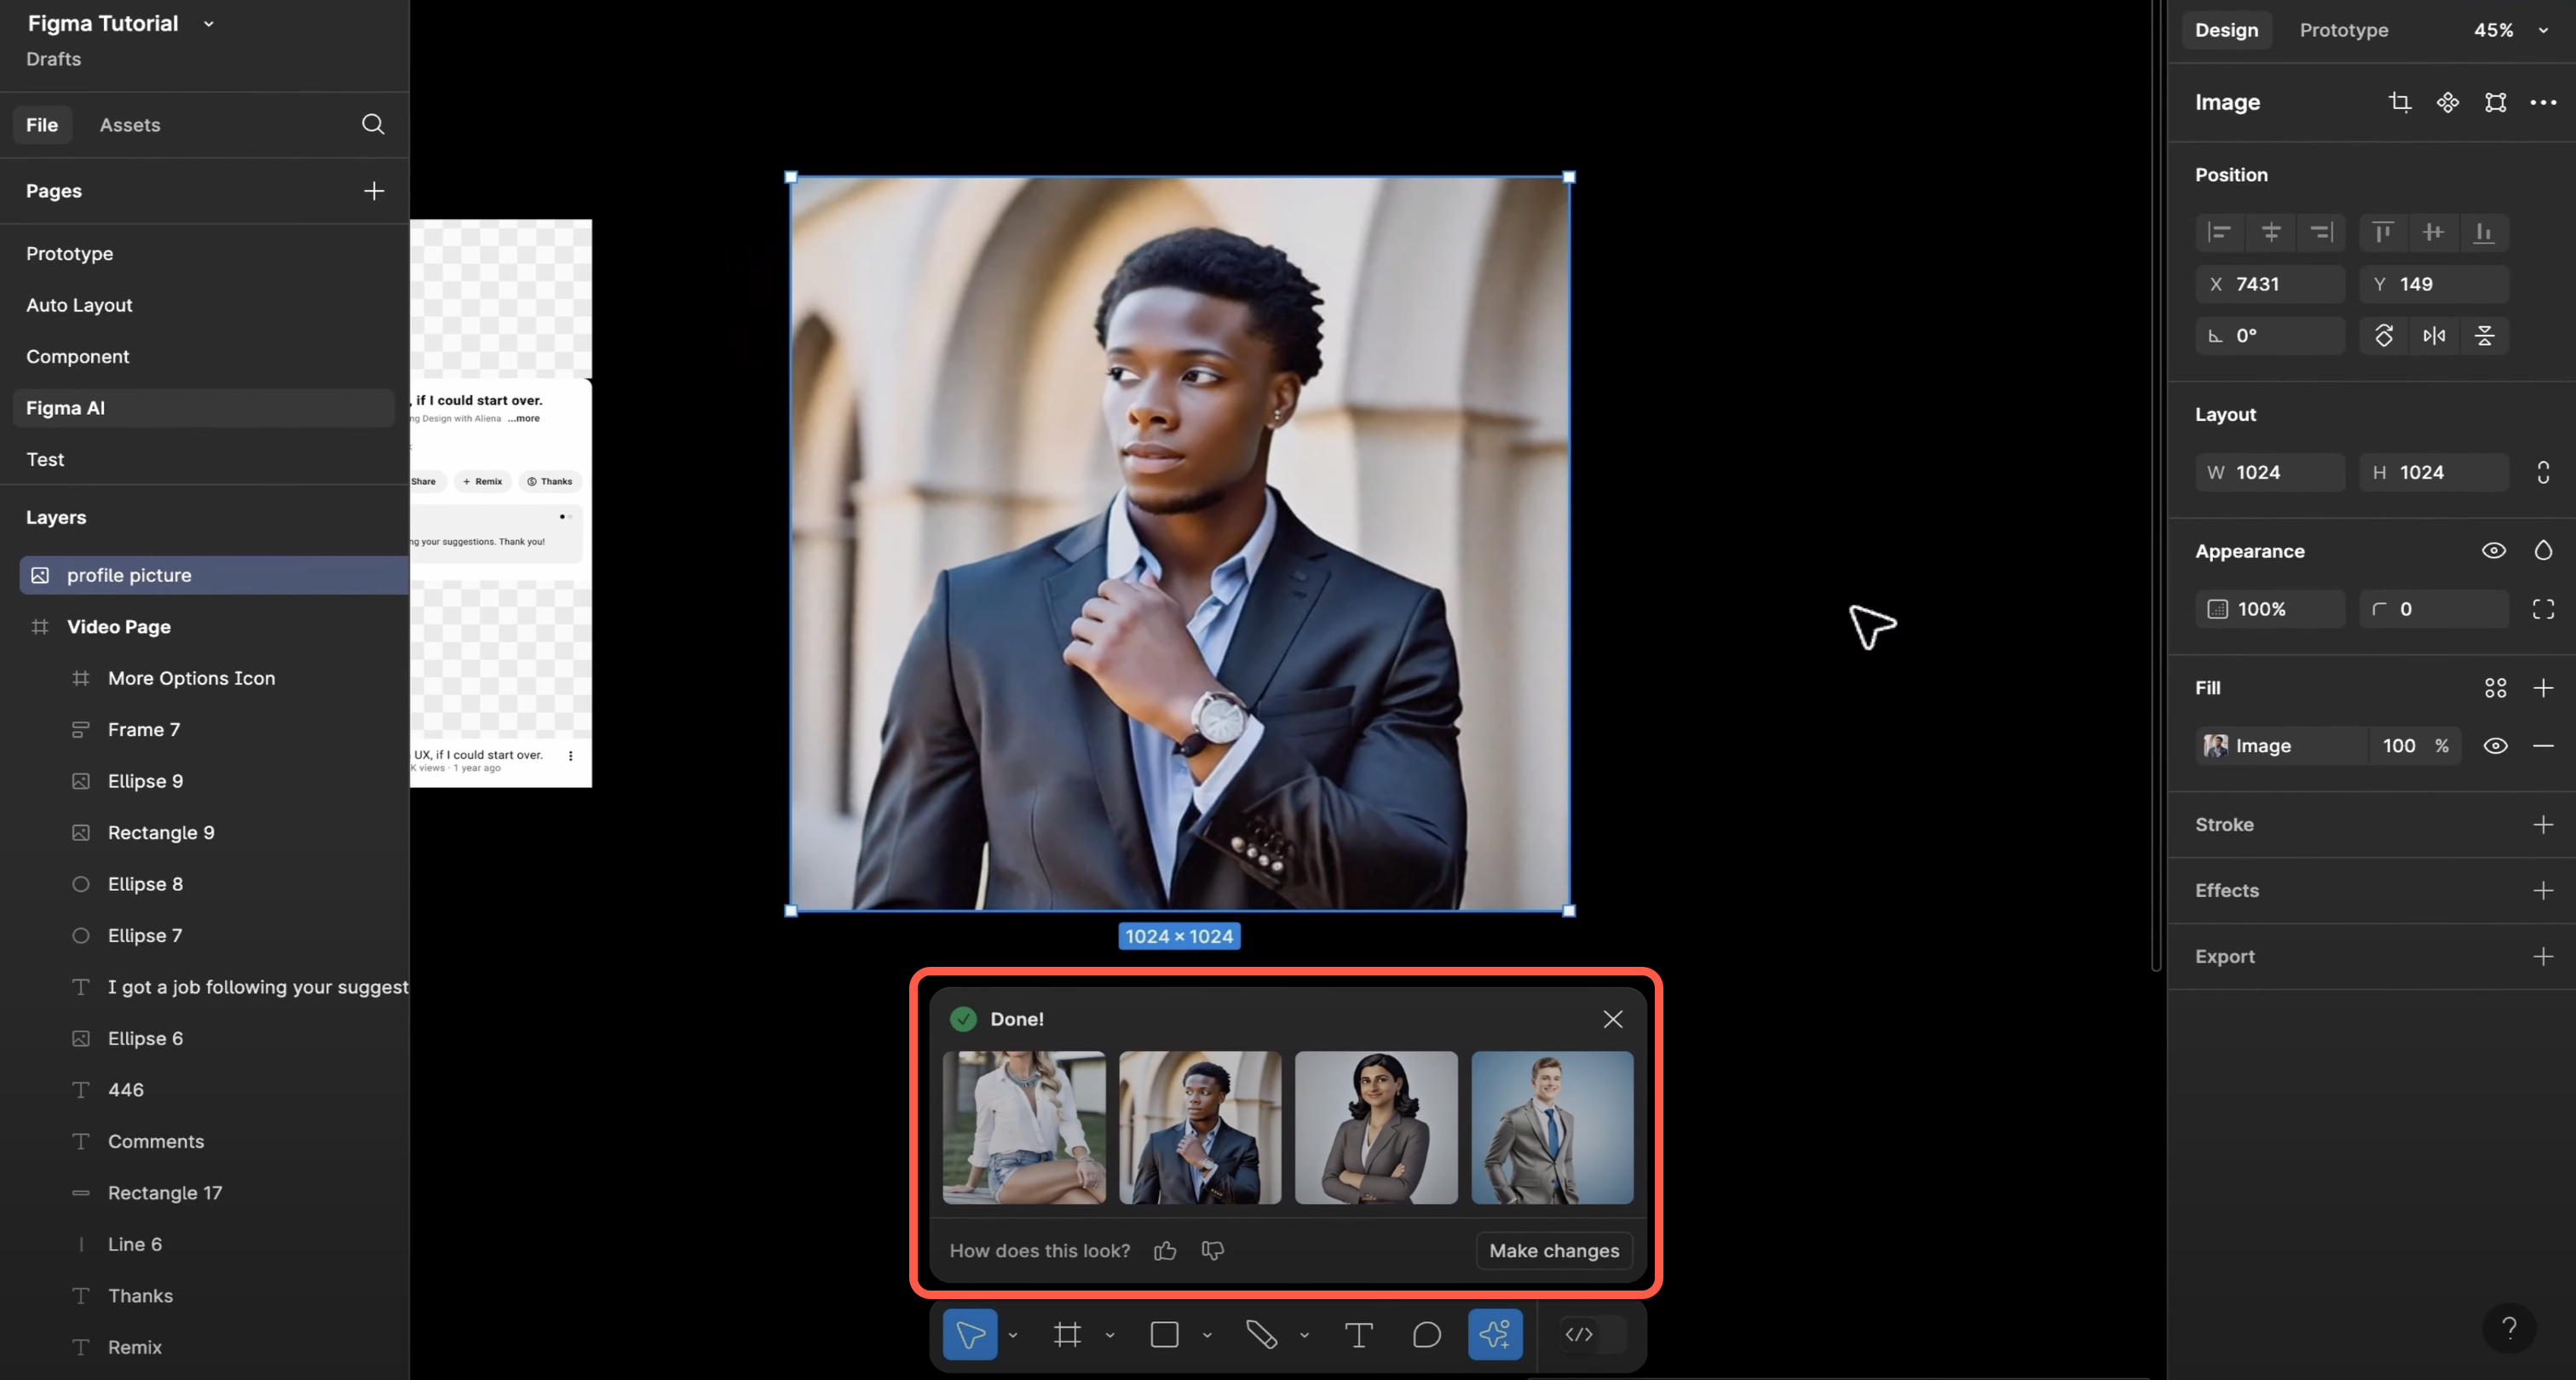
Figma will generate multiple image options. Choose the one that fits best, or further refine your prompt.
You can use this feature to add visuals like hero images, avatars, or product shots without leaving your design file. It works best for individual image generation and edits.
6. Remove background
The Remove background feature lets you isolate subjects from their backgrounds. It’s fast, clean, and built directly into the editor, making it perfect for quick edits like product shots, avatars, or thumbnails.
-
Select the image you want to edit.
-
Click the Actions icon in the toolbar and choose Remove background from the menu.
Figma will process the image and remove the background in a few seconds.
Keep in mind, though, the AI supports images up to 2000×2000 px and under 1.5MB — larger files won’t work.
7. Rewrite The Text
This feature makes it easy to polish or completely transform text inside your designs. You can adjust tone and rewrite copy.
This is especially useful when you’re refining microcopy for buttons, cards, or UI elements during prototyping.
-
Select the text layer you want to refine.
-
Click the Actions icon in the toolbar and choose Rewrite this.
-
Enter a clear prompt and hit Rewrite.
You can also use a prompt to generate copy from scratch.
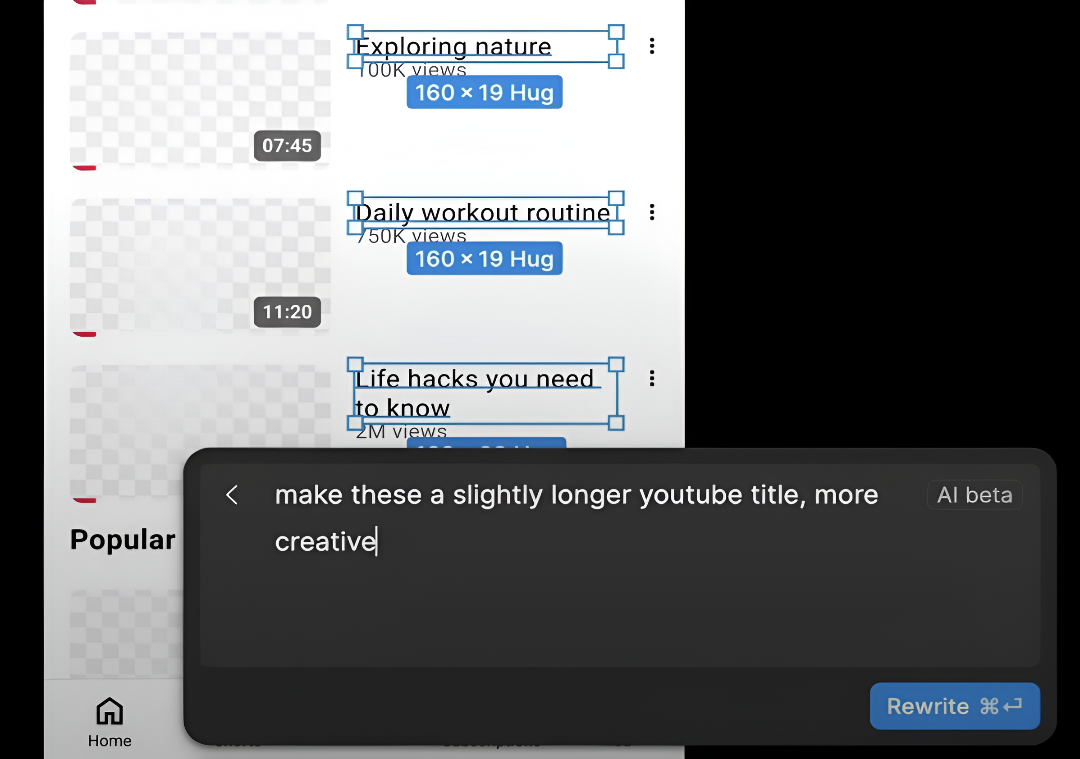
This is handy when you want to quickly experiment with different tones and text variations for prototypes. Just ensure your content sounds human and isn't using obvious AI language.
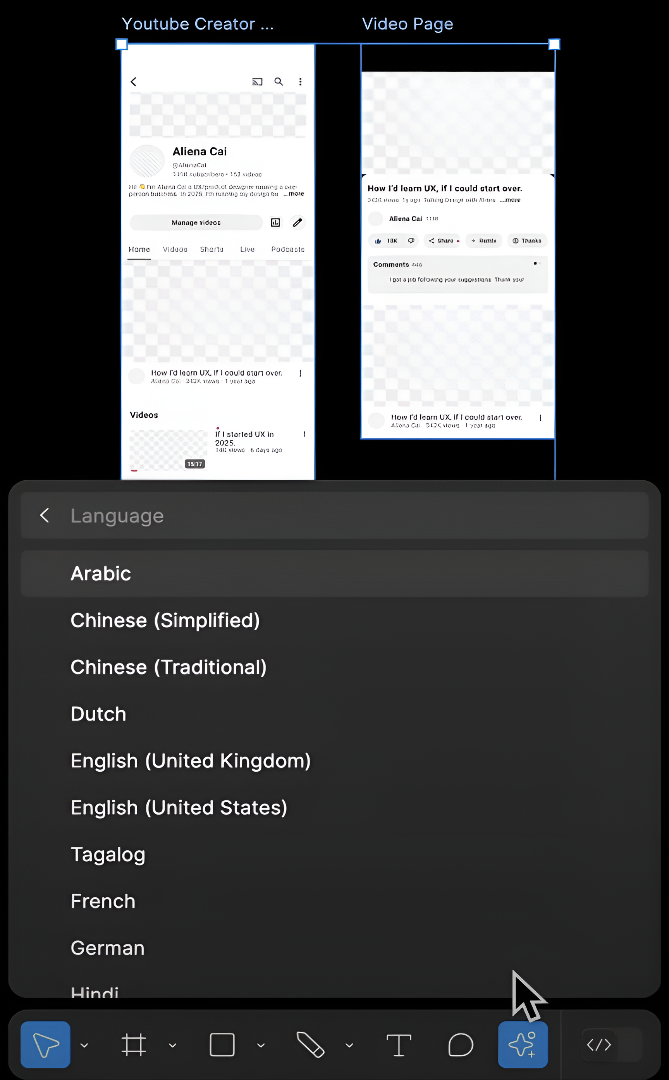
8. Translate Text
This feature makes it super simple to localize your designs for different regions. Instead of manually rewriting every text layer, you can instantly switch languages.
It works across entire frames, so even mixed styles and multiple text elements stay properly aligned.
-
Select the text layers, frame, or group you want to translate.
-
Click the Actions icon in the toolbar and choose Translate to....
-
Pick your target language from the list, and Figma AI will instantly translate all selected content.
9. Shorten Text
This feature is perfect when your copy is too long to fit cleanly in a design, like a button, card, or mobile layout. Instead of manually editing text, you can refine it while maintaining its clear intent.
-
Select the text layer that you want to shorten in your design.
-
Click the Actions icon in the toolbar. Choose Shorten and Figma will rewrite the text into a more concise version.

It’s a quick way to clean up lengthy content and make sure your UI looks sharp and uncluttered, especially on smaller screens.
10. Add interactions
This feature is a huge time-saver when you want to build clickable prototypes quickly. Instead of manually linking every frame one by one, the AI intelligently connects your selected screens and sets up basic navigation for you.
This is especially handy when working with multi-page flows or app screens.
-
Select your frames and click on Add interactions.
Figma will instantly generate prototype connections between your selected frames.
Preview your prototype's user interactions and make any changes to align with your desired user journey.
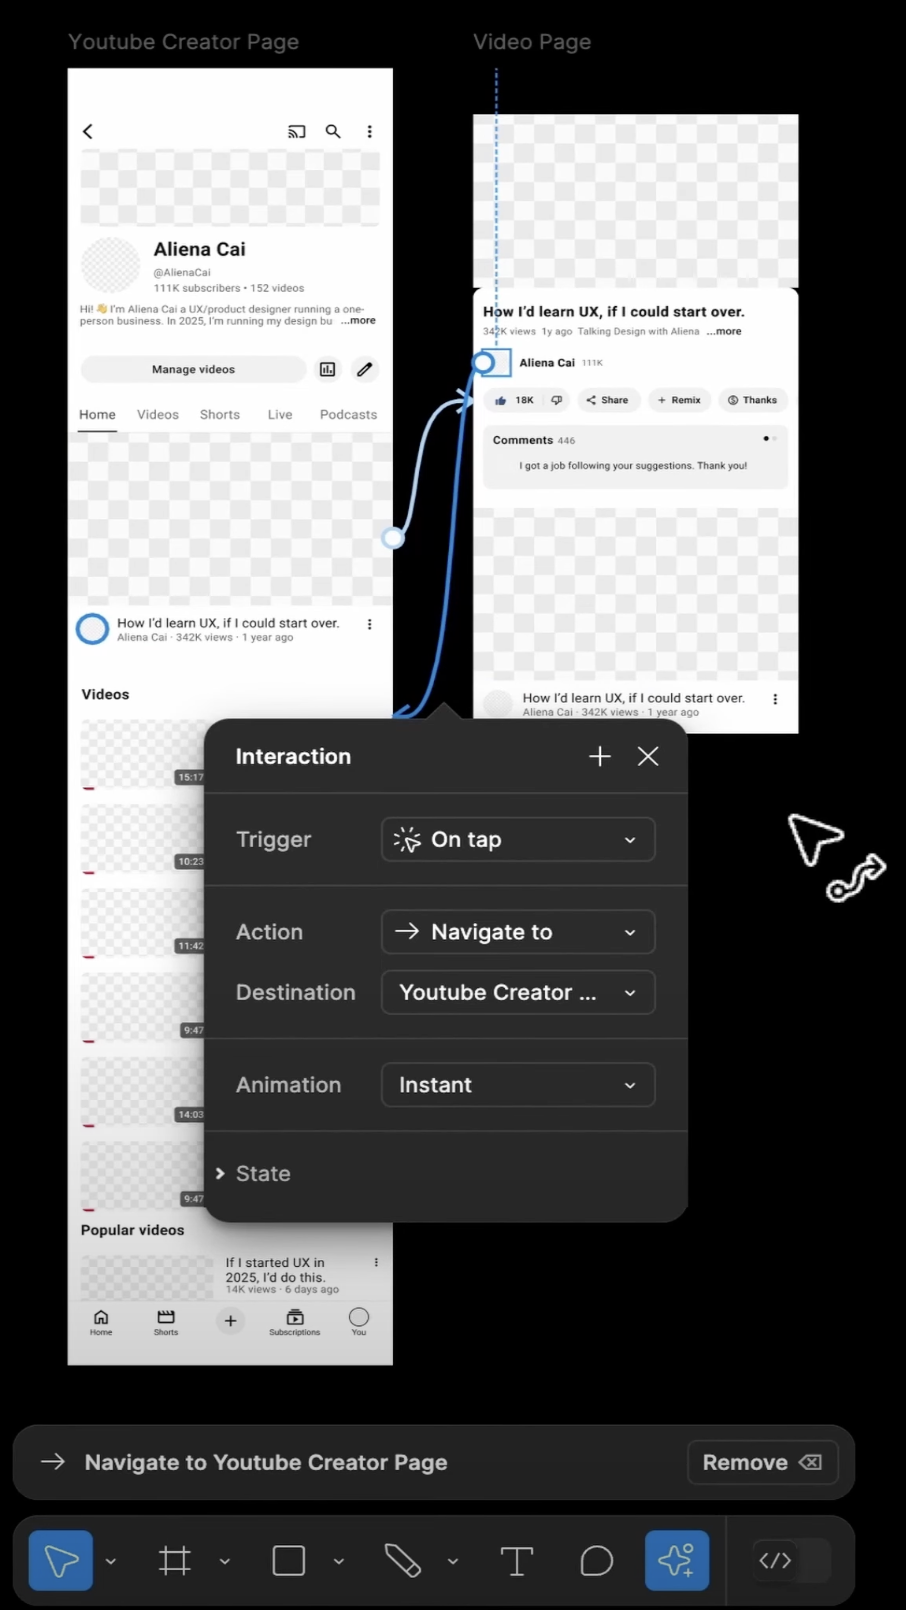
Keep in mind that AI-generated interactions are best for straightforward navigation flows. For complex behaviors like multiple actions, delays, or conditional logic, you’ll still need to set those up manually.
Tips for getting better results with Figma AI
A few smart tweaks can help you get more accurate layouts, better copy, and cleaner results without wasting time on multiple edits.
Use clear, descriptive prompts
AI performs best when it knows exactly what you need. For example, a vague prompt like:
“Create a homepage” can lead to generic layouts.
When writing a Figma AI prompt, be specific and structured so the tool understands your design intent. Here are some factors to include:
-
Industry — e.g., “for a SaaS startup,” “for a luxury fashion brand.”
-
Category — e.g., “marketing landing page,” “blog layout,” “e-commerce product page.”
-
Audience — who will use or view it (marketers, developers, shoppers, students).
-
Website style & tone — modern, minimal, playful, corporate, editorial, etc.
-
Core goals — conversions, readability, storytelling, portfolio showcase.
-
Key elements — CTAs, hero section, product cards, forms, navigation style.
-
Visual vibe — colors, typography, imagery (optional but useful).
For example,
“Design a minimal, editorial blog layout for a film website targeting cinephiles, with strong typography, dark mode option, and sections for long-form essays and video embeds.”
Combine Figma AI tools with plugins
Figma AI is even more powerful when paired with the right plugins.
For example, UX Pilot’s Figma AI generator can generate UI designs within Figma. Combining both helps you speed up repetitive work and achieve more refined outputs.
How to use Figma AI for free?
You can use Figma AI for free if you are a student or educator. Otherwise, Figma AI is only available to paid users.
Key takeaways
-
Figma AI helps speed up design work by handling tasks like generating layouts, refining text, translating content, and editing images—all inside the editor.
-
Clear, detailed prompts lead to better results, while pairing AI with plugins like UX Pilot’s Figma AI generator makes the workflow even more powerful.
-
Features like First Draft, Replace Content, and Duplicate with New Content help you create structured designs and realistic copy in seconds.
-
Text-focused tools such as Rewrite, Translate, and Shorten make it easy to refine and localize content without leaving your file.