Generate Wireframes in Figma with UX Pilot AI


Adam Fard
Created on Jul 19, 2024
If you've ever created wireframes by hand, you're familiar with the struggle—it’s a tedious, repetitive task that can drain your time and energy. Endless hours spent drawing, revising, and juggling feedback from your team can be downright exhausting.
Imagine if there were a simpler way to draft your interface design blueprint. Fortunately, there is. Meet UX Pilot, an AI-powered tool that streamlines the process, making it quicker and more efficient than ever before.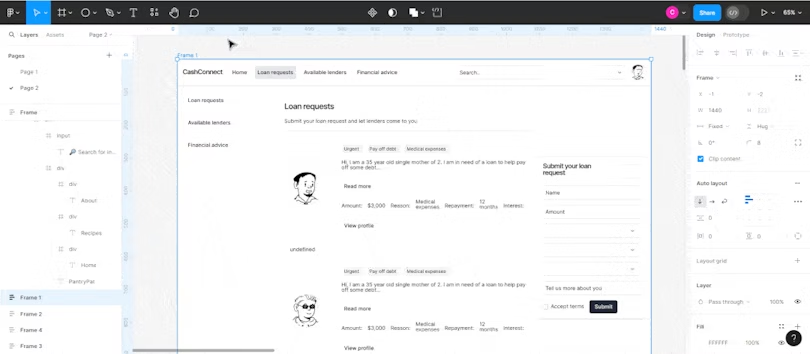
Impressive, right? Or maybe you're already a pro at using AI for wireframe creation. Either way, let's dive into what sets this tool apart.
UX Pilot Wireframer is not your typical wireframing tool. It goes beyond merely rearranging components within a set structure to match your design brief. In fact, there are no constraints on the structure or layout of the wireframes it generates. Whether your design concept is straightforward or completely out-of-the-box, UX Pilot delivers wireframes that perfectly match your creative vision.
But here’s the real kicker:
You can accomplish all of this directly within your Figma design file. Curious about how it works? Keep reading as we walk you through the process of generating wireframes with UX Pilot in Figma. And if you're still wondering why AI should be a part of your wireframing workflow, we've got answers for that too.
Ready to unlock the wireframing magic of UX Pilot? Let's dive in!
But first, what are wireframes and why do you need them?
A wireframe is essentially a blueprint or a skeletal outline that delineates the layout and structure of a website or app’s interface. It uses basic shapes, placeholders, and text to sketch out the primary structure of a digital product, excluding detailed visual elements like colors, images, and typography.
Imagine the frustration of dedicating countless hours to perfecting a digital product, only to find out that its fundamental functionality is flawed. Wireframing acts as a safeguard against such scenarios. Similar to architectural blueprints for buildings, wireframes offer a low-commitment method to define an interface's structure and functionality before delving into intricate design elements. This process ensures that the foundation is solid, saving time and resources in the long run.
How to generate wireframes with UX Pilot Wireframer
We’ll be taking you through a four-step process for creating quick wireframes with UX Pilot Wireframer:
-
Create a UX Pilot account
-
Launch the plugin in Figma
-
Prompt the AI
-
Edit your wireframes
Create a UX Pilot account
To unlock the amazing features of UX Pilot, you'll need to sign up. Just visit uxpilot.ai and click the 'Start for Free' button. You can register using Google authentication or your email address. If you choose to sign up with your email, simply provide your details, verify your email, and you're good to go!
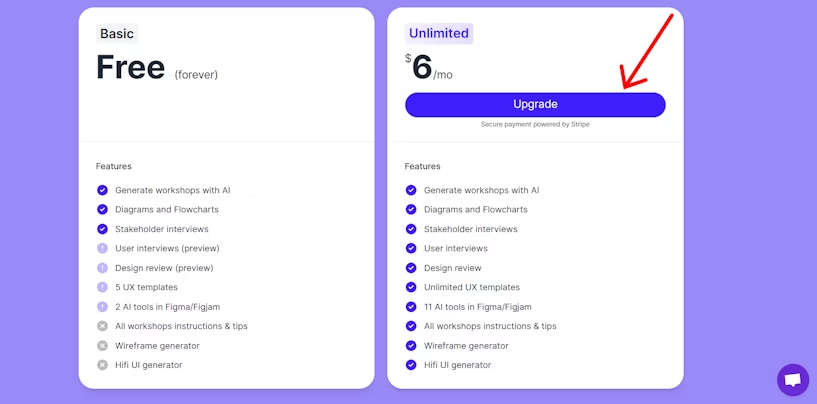
Once your account is set up, dive into the incredible world of UX Pilot at no cost. However, to experience the full suite of features, including the high-fidelity UI generator, you'll need to upgrade to the premium plan, which is just $6 a month. This upgrade process is quick and easy.
On the homepage, find and click the 'Upgrade' button at the top of the screen. Under the unlimited plan, click 'Upgrade' again and follow the on-screen instructions to complete your payment. Enjoy all that UX Pilot has to offer!
Launch the plugin in Figma
From your Figma design file, go to the plugins community and search for UX Pilot. Then select UX Pilot AI: UI Design & Wireframes from the available plugins.
Once the UX Pilot pop-up window appears, it’s time to prompt the AI.
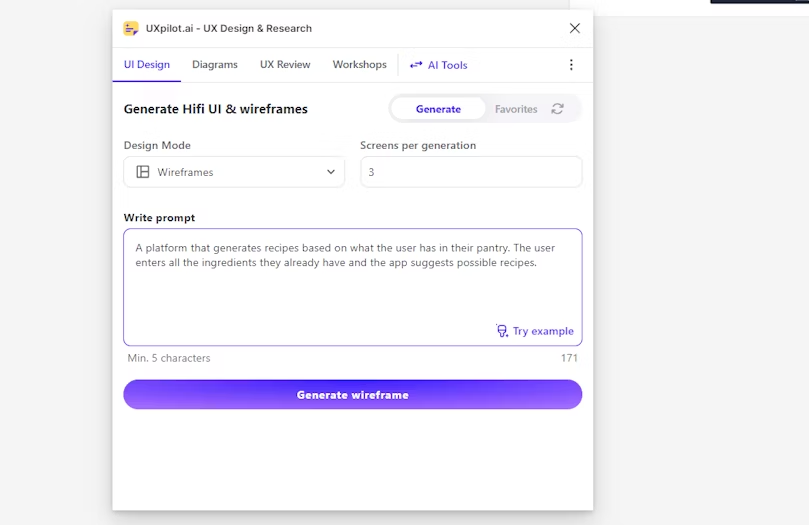
Prompt the AI
Entering your text prompt is straightforward as the UX Pilot interface is user-friendly and intuitive. Let’s take a quick tour of the interface:
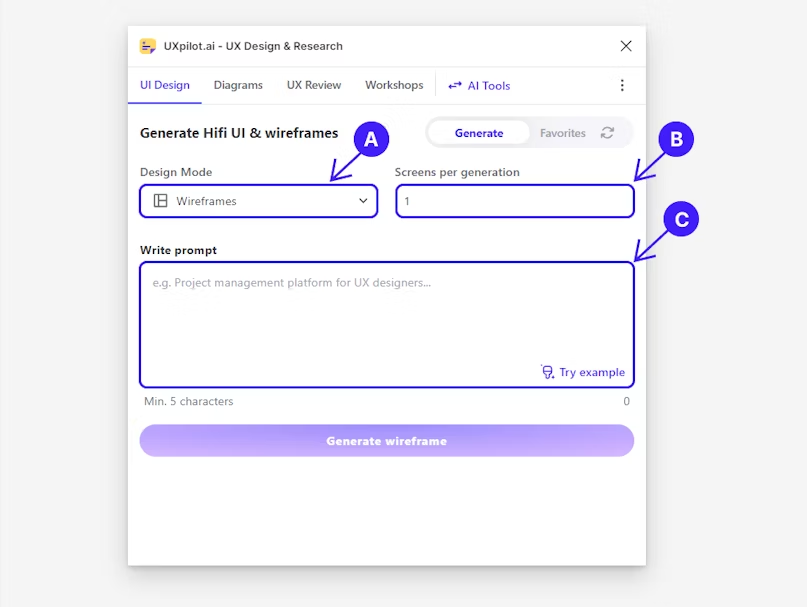
A. Design mode: Select your preferred design fidelity — wireframe or hi-fi.
B. Screens per generation: Choose the number of screens you want the AI to create. Options range from 1 to 4 screens.
C. Write prompt: Provide a brief description of your design project in plain English. The description can be as vague or as detailed as you like. Remember, the more detailed your description, the better the output will match your vision.
In the box labeled ‘Write prompt’, enter a brief description of what you want to create. For our first example, we’ll ask the AI to generate wireframes for a platform that connects individuals in need of financial assistance with potential lenders.
Here’s our prompt:
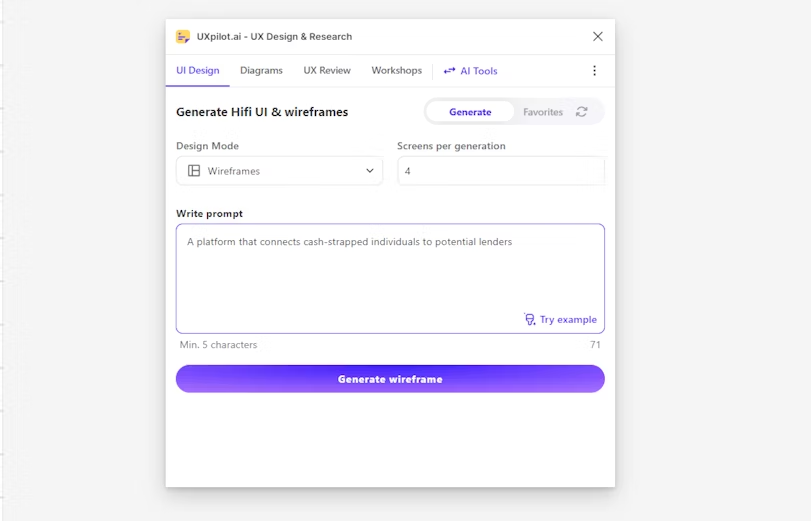
Once you’ve entered your description, click ‘Generate wireframes,’ and you’ll have your wireframes in a matter of seconds.
With a simple text prompt, the AI produced remarkable features for our lending/borrowing platform's homepage, such as:
- Intuitive loan request form
- Personalized user dashboard
- Efficient search bar
- Dynamic loan request cards
- Interactive available lenders cards
- Real-time messaging feature
These clever ideas provide a robust foundation to spark your creative genius.
Let’s elevate our approach with another example. This time, we’ll prompt the AI to create wireframes for an unconventional idea. Here’s our text prompt:
And now, let’s take a look at the output.

The generated wireframes align seamlessly with the provided prompt, featuring
- A field to input available ingredients
- A list of commonly used ingredients
- Recipe suggestions
- A detailed recipe page
These examples demonstrate how the AI generator creates the essential screens for your website or app. You can use these as a starting point and expand by adding more screens to complete your user flow.
Edit Your Wireframes
Editing your wireframes is as intuitive as modifying any Figma design. Simply select the element you wish to change and adjust it as you would with any other design component in Figma.
Why Incorporate AI in Wireframing?
The design ideation phase can often be challenging, especially when starting with a blank canvas. Instead of facing the daunting task of creating ideas from scratch, you can use AI to give you a head start.
As shown in the examples, integrating AI into your wireframing process not only accelerates your workflow by enabling rapid experimentation but also inspires new ideas you might not have considered. These novel ideas can serve as the foundation for truly innovative designs.
Conclusion
We've demonstrated how you can transform your ideas from a simple text prompt into wireframes within seconds using UX Pilot Wireframer. Leveraging the power of AI saves you time and energy, allowing you to focus on refining and perfecting your ideas rather than starting from scratch. Best of all, you can do all this without leaving your Figma design file.